Art Journal

Nature Ramblings ~ Past Times Time Travel ~ Romancing Daily Life
Showing posts with label pattern work. Show all posts

Saturday, January 16, 2016

I gotta remember to Stay-Stitch those sleeves! Muslin: M6076 - Princess Seamed Shirt - Pattern Work


I cut out the muslin for this princess-seamed shirt a while back. It's the same pattern, M6076, I first started using to create my sleeveless Western Winds shirt back in the early fall. Now I'm continuing to create a sleeved version. This pattern has multiple princess-seamed options (a princess-seam can end up in different spots on the garment) and lots and lots of instruction sheet ideas for getting a good fit. A really good basic pattern.

I'm not instruction sheet oriented - so I have a tendency to forget about stay-stiching! And then I wonder why the sleeve stretches out of shape when I go to set it in! Same deal with other curved seam areas. And it's particularly important when I'm creating a muslin/toile - because this is the time for getting the seams to come together right .

Set in Sleeve test - the outer line is stay-stitching (regular stitch line).
The inner line is a basting stitch for easing or setting the sleeve cap into the
armscye (the curved opening in the bodice)
I added two tucks in the front of the sleeve cap, because after I measured the alterations to the bodice (the armscye line), 
I found that there was too much sleeve cap. I want only about 3/4" more in the sleeve cap, than in the armscye. Also I took note
as to the center of the sleeve - so I only altered the front, the back looks like it has about the right amount of extra.

I must admit, this is not exciting sewing. In the past I always just went ahead and sewed up a pattern and hoped for the best. But I've learned the value of a well fitting pattern. It means I'll get this one pattern working for me - and then I can just zip through future versions, knowing they'll look and fit great and I'll reach into the armoire for them again and again.

I added a one inch seam allowance for fitting a muslin/toile.
Learned this from Lynda Maynard.
I used a double Clover tracing wheel for this - it has two heads.


Sunday, November 29, 2015

Pattern Work - Working For My Plaid - M6076 Princess Seamed - With Sleeves

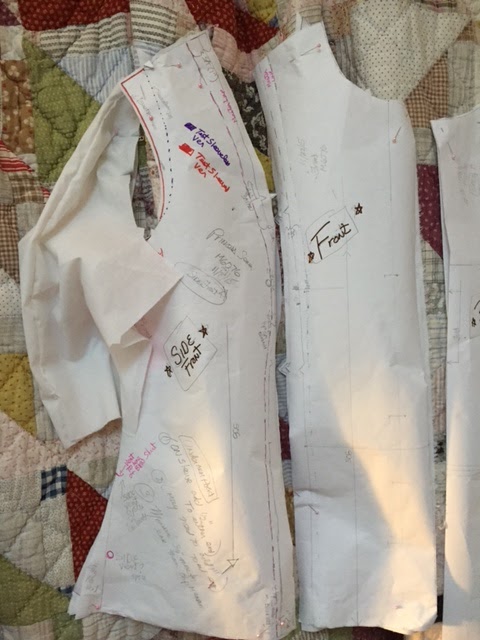
Can't you just envision these pattern pieces and muslins as a red-plaid princess-seamed shirt?
In the November episode of the Enchanted by Sewing audio/pocast, I talked about sewing tartans and plaids. I also mentioned I have plans for a new red plaid, princess-seamed shirt, using M6076. As you may have noticed in my recent postings, Jasper-the-new-pooch has been sewing my slow sewing down even more. Still, I have gotten in some pattern work!


All four pattern pieces have a muslin attached. My next step is to transfer the seam lines onto the muslin, before I begin basting.

 I drew those seam lines  onto the pattern, based on the measurements I took from the sleeveless Western Winds shirt, which I created from this same pattern (altering to create a sleeved version as well as getting a good fit for me). I've really enjoyed wearing Western Winds and got quite a lot of late summer/early fall use out of that shirt - of course here in California it stays warm longer than much of the U.S.

For Western Winds, I cut back the top of the shoulder towards the neck, but I've dropped that back in place for this sleeved version. My new pattern includes lines for both sleeved and sleeveless versions. I  cut with room for either version, then use my clover wheel to lay down the armscye lines, then cut away what I don't need for the particular version I'm making. 

For more description, see my previous post- Sleeved to Sleeveless.

There's a good chance I'll be making a few more changes to the muslin, and therefore pattern, before I snip into that red plaid. I also plan to re-test the new pattern on another sleeveless version, sometime over the next few months. Tried and true patterns take a while to get just so, but they sure are worth their weight in gold.
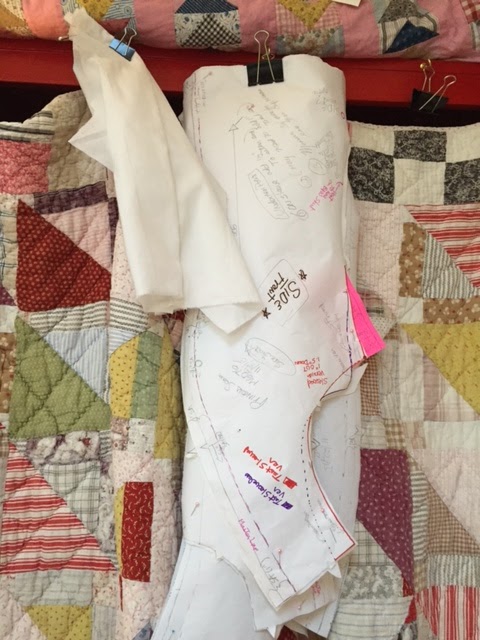
I store in-progress muslins and pattern pieces clipped onto binder clips  hanging off cup hooks. That way they don't get wrinkles in between sewing sessions, and they all stay together.


Monday, October 12, 2015

Western Winds Princess-Seamed Sleeveless Shirt- Terminado/Finished!

I talked about the process of altering the princess-seamed shirt, commercial pattern M6076, back in Fitting Western Winds . I used my sloper to work in conjunction with the pattern.

Fitting + sewing made it such that I put off finishing the project. It means the project took a little longer. And yah know how 'tis.... when I don't sew every single day a project looses it's oomph. I wanted to get going with something else new when I had time to sew.


Good thing I had a trip to visit with my dear cousin in San Diego  motivating me to finish my Western Winds shirt. I loved wearing it on the trip, and have worn it several times since. It's still summer-warm in my part of California. Aren't I glad this good warm weather basic didn't become a UFO, because it's been adding a lot to my just-doesn't-feel-like-fall-yet wardrobe.

BTW I simply used bias tape to finish off the inside of the armscyePor que no? It works great and I had it already.

Fabric was from the "Japanese Cottons" section at Stone Mountain and Daughters in Berkley (in my materials inventory for about a year and a half) 


Horsey buttons were in my buttons inventory - scored them free somewhere. They give it that true western feel, don't you think?


Western Winds - Terminado/Finished!

I talked about the process of altering the princess-seamed shirt, commercial pattern M6076, back in Fitting Western Winds . I used my sloper to work in conjunction with the pattern.

Fitting + sewing made it such that I put off finishing the project. It means the project took a little longer. And yah know how 'tis.... when I don't sew every single day a project looses it's oomph. I wanted to get going with something else new when I had time to sew.


Good thing I had a trip to visit with my dear cousin in San Diego  motivating me to finish my Western Winds shirt. I loved wearing it on the trip, and have worn it several times since. It's still summer-warm in my part of California. Aren't I glad this good warm weather basic didn't become a UFO, because it's been adding a lot to my just-doesn't-feel-like-fall-yet wardrobe.

BTW I simply used bias tape to finish off the inside of the armscyePor que no? It works great and I had it already.

Fabric was from the "Japanese Cottons" section at Stone Mountain and Daughters in Berkley (in my materials inventory for about a year and a half) 


Horsey buttons were in my buttons inventory - scored them free somewhere. They give it that true western feel, don't you think?


Saturday, September 26, 2015

Blue-Sky Sewing - Rose Embellished End of Summer Frock

Since I got my sloper done, I look at other woman's frocks with a new eye. I ran into Rebecca, on a toasty day while we were waiting for our devices to get fixed at the apple store, and she was kind enough to let me photo her in this great rose-embellished, gingham summer dress.

Looks like maybe six tiers in that nice big rose. It starts above the natural waistline, and extends below the full hip.

This great gingham cotton frock also has bust darts.

I would try to recreate something like this by simply eliminating the front torso fisheye darts in my sloper, and maybe also grading the pattern out from beneath the bust darts?


Wednesday, September 16, 2015

Fitting Western Winds - Princess-Seamed Shirt M6076 (Journal/Sloper/Pattern Work)

Journaling - Learning to fit and work with my sloper.

M6076 - Three princess-seamed shirts
I'm also learning to question, my sloper.

I'm starting with a basic princess-seamed shirt pattern - McCalls 6076.

Initially I'm working with the princess-seam in shoulder seam option (view A). (others in line drawing below)

Noted so far
- Learning to compare front or back pattern pieces to my sloper, I have to learn where to place them. Do I line up the base of underarm seam/armscye? If I start comparing at shoulder seam I can get thrown off because I often need to alter this area - except on some commercial patterns, when it's fine!

First time through with a test-garment (that's the one I'll actually wear, one step beyond my muslin) I'm making a sleeveless version. I'm taking careful note of where I
-a- I alter  the underarm seam (armscye) to create a tighter fitting armhole
-b- Take  the top of the armhole back somewhat, for this no-sleeve version.

Later I'll test the muslin with a muslin sleeve, where I'll test the pattern without both of these (a and b) alterations.

Another benefit to a sleeveless test garment is,  I'm getting it out of a piece that is somewhat less than 2 yards. I will be piecing the under collar, and also the front facing. But I don't expect those piecing line to show.

Waistline and Princess Seam Alterations
Working on a very fitted look without overfitting
 Would be better to add an extra seam allowance - 1 inch instead of 5/8-  for all this playing around
Lots of trying on here! Did same front and back on all 4 princess seams

I made sure to safety pin the front closed matching up the button hole marks, so that I don't overfit. I want the shirt to button and need a certain amount of overlap for that.

- First I basted a 1/4 inch seam along the princess stitching line
- Then increased (still with a basting stitch) the princess line seam allowance to 7/8"
- Then I unabasted the second line of basting below the bust and graded back to the 7/8"

- Finally I took in/graded the waist with a kind of elongated half oval, about 3 and 1/2 inch above and below the waist. Challenging figuring out when to alter waist and when to alter princess seams - lots of safety pin basting helped with that

Altering Armscye/Armhole for Sleeveless Version

 I took the shoulder seam back towards the neck for an improved sleeveless style

* Compared to my sloper, and graded in 1/2 inch at bottom of armhole/armscye on side seam for sleeveless. Then I graded back out  to original side seam after, hummm.... about one to two inches? A french curve is handy for doing that. I admit, I eyeballed it. I kept the original full seam on the pattern, because I'll probably want it for the sleeved version. I also kept it on the muslin  so I can reuse the muslin when testing a sleeved version.

* I also tested  raising the side seam up for the sleeveless version (based on what I learned in French Pattern Drafting class going from moulage to sloper) , but it was too tight.


* For sleeveless, I'm  raising outside shoulder (taking it back towards the neck line) for sleeveless style - 1 3/8" (11/8") without S.A. - so probably either 9/8 (1 and18) or 6/8 (3/4) " cut back/off - the first for 1/4" and second 5/8" S.A. I'll mark on the pattern what works for sleeveless - but keep the full original armscye on pattern for sleeved version test.

In addition to desirability of a sleeveless shirt for our late-running summer-in-fall weather, this helps me to focus on fitting aspects of the torso. The sleeve adds in a whole 'nother fit challenge, even though it means I have to make alterations when I go between sleeveless and sleeved. A good reason to journal!

M6076 - Test Garment Fit In Progress


Shoulder Seams
 * I ended up adding 1/2" (better would have been more - because I only took a 1/4 "seam allowance (S.A.)  - so next time add in 7/8") to the back
* I therefore took back 1/2" from the front  because of alteration to back. Again because I only sewed the 1/4" S.A., next time through I will add back another 3/8 inch and sew  a full 5/8" S.A.

* I've made this shoulder line adjustment many times, the reason I didn't catch it when comping my Master Pattern Trace (M.P.T.) to the sloper? For the back - I forgot that the S.A. is not included in the sloper pattern, as it is in the commercial pattern. (Often forget this). For the front, I don't know. The front of my sloper just looks too high. The No S.A. sloper comes out at the same time as the M.P.T.. So it seems like maybe I should make a tentative adjustment to my sloper front - dropping it by perhaps.... 3/8 or 1/2 inch. It's challenging thinking between with and without S.A. But this is something to think about math 'wise as I continue to work comparing my sloper to patterns I trace.

- I pin basted the muslin to make sure I had a basic fit, but I really didn't see the shoulder issues until I cut out and stitch -basted the test garment. In the future, maybe encourage myself to stitch-baste that muslin. I have a way of not seeing the pattern as real until I move past the muslin. It seems good enough, and I really want to see it as an actual garment. And with the pins in, I'm always in a hurry to get out of it!

I basted with a stitch  length of 6 and starting out with 1/4" seams. Then I keep trying it on and increasing the S.A. up to 5/8" . Alternatively, I could have added a full 1" S. A. on the first pass,  but I figured since the muslin was OK, I didn't need to.

Right now I'm happy with accurately placed shoulder seams - which gives a shirt a custom fitted look. I took in the 2 side seams more, but they are still a little loose. However, I haven't yet basted a deeper princess seam (4 actual seams). Once I check those, I'll know if I want to grade in - all or some of - the side seams to increase the fitted look.

~ ~ ~ Web Resources ~~~
An interesting related fitting post, that journals some of the challenges of fitting a basic princess-seamed pattern http://artisanssquare.com/sg/index.php?topic=16322.0

Thursday, September 10, 2015

Ench By Sew-36: Fiona, the Irish Laurel Dress


Dress creation brings out the romantic in me. When I looked ahead to my summer sewing, I thought if I could sew only one garment for the season, it would be a dress. Fiona, the Irish Laurel dress, satisfied my yearning to design and sew the perfect summer frock.

Hey let’s listen to the show! To do that you can either download the ‘cast from iTunes - Click on this link to iTunes  , 
*OR* listen directly on the web, by clicking on this link
* * *

This dress was a very satisfying project for my arty romantic style

In between sewing summer essentials - shorts and tees - I worked off and on to determine what design lines spoke to me about summer, mock up a miniature sloper pattern to test my ideas, draft a pattern from my sloper, and then finally to sew up Fiona, while summer was still on!


* Pensamientos Primeros - Thinking through my idea for this summer dress
     - Part 1 - Planning Fiona
        - Part 2 - Farewell to Summer Romancing Fiona, the Irish Laurel Dress  
*Technicos - Pattern Drafting and Kissing Zipper using a Prick Stitch

*Pensamientos Finales - Fiona's Design Lines have roots in my own history

Finians Rainbow was a modern American fairy tale. It expressed late 1960's dreams for racial harmony and folks coming together. Fred Astaire (Finian McLonigan) and Petula Clark(his daughter Sharon) added in the romance of America seen, and idealized, fresh from Irish eyes. The story of Finian's determination to plant himself a crop of Irish gold, intertwined with romance of countryside and a new happpily-ever-after love for Sharon draws me in as well today as it did when I was a kid who'd only recently arrived in a new place myself. Any wonder that the movie's costumes inspire my pattern work and sewing today?


Visit Me Encanta Coster/Enchanted by Sewing - my regular sewing blog for other summer sewing I enjoyed along the way... in between time spent bringing Fiona to life

Tuesday, September 8, 2015

Farewell to Summer - Romancing Fiona, the Irish Laurel Dress (Part 2/2 -Termindado!)

Fiona, the Irish Laurel Dress
Fiona is made from a yellow green Linen-Rayon blend, lined with Bemberg rayon.
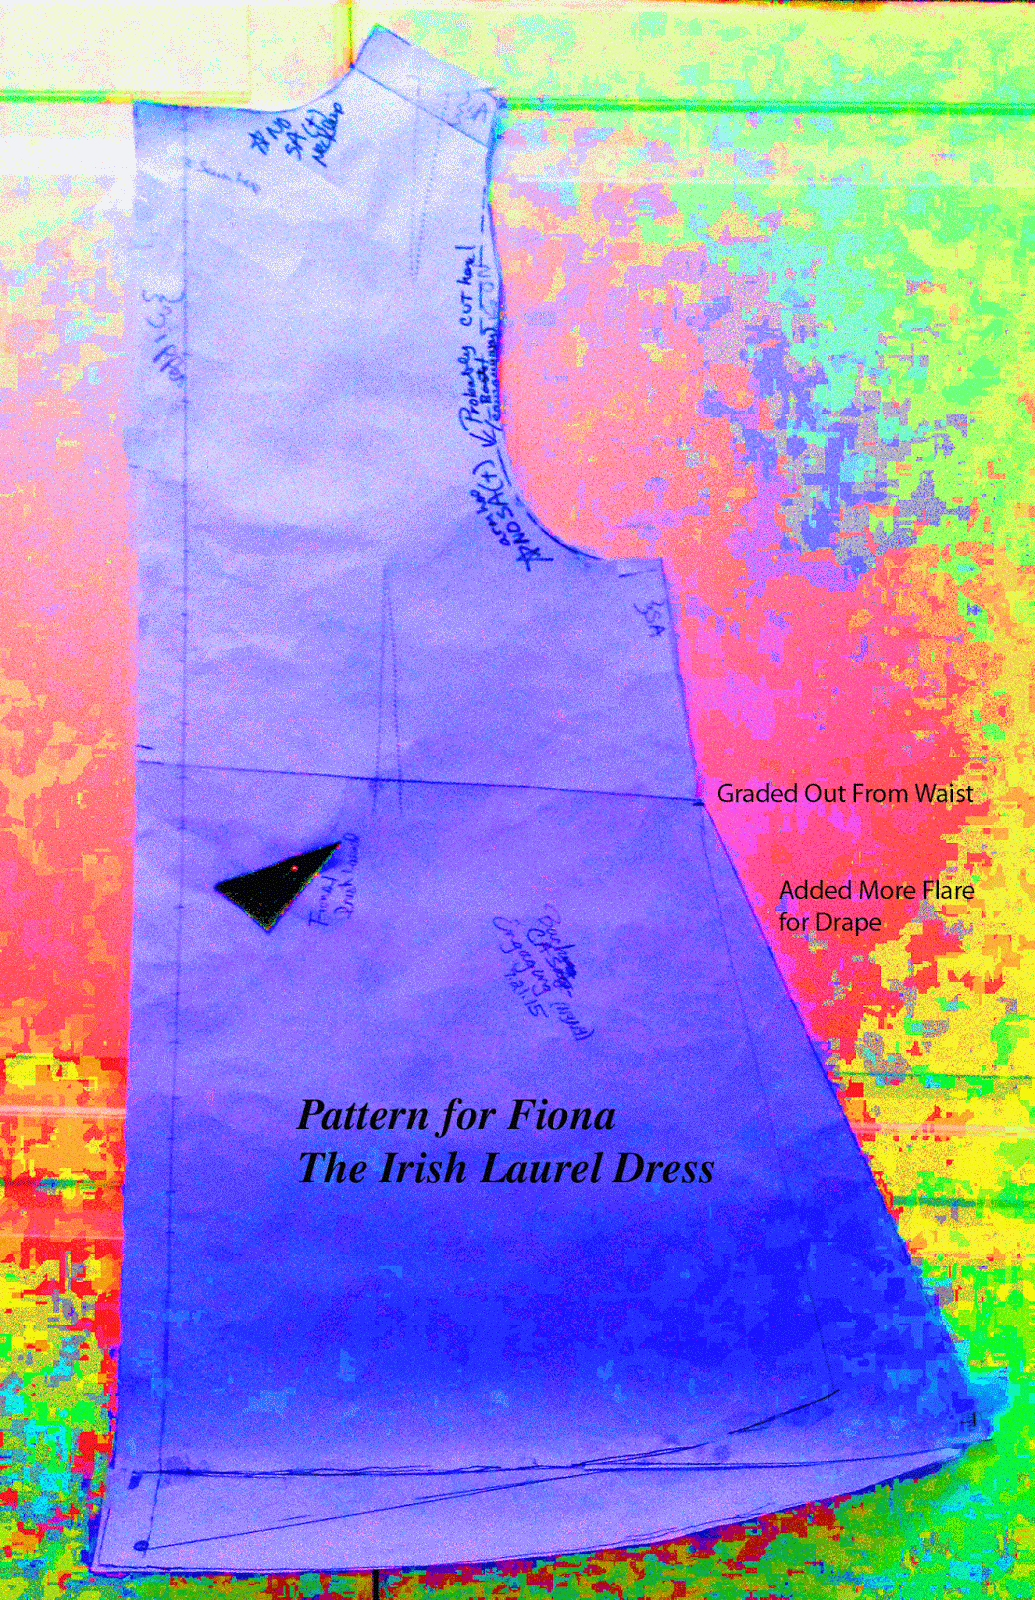
This dress has a one piece front and one piece back.
It includes front bust darts, back shoulder darts and partial darts that open like tucks in the torso front and back. The bodice above the dart/tucks is quite fitted.
The kissing zipper is prick-stitched.

I started day dreaming about creating Fiona at the beginning of summer. Then  in Fiona, my Summery Irish Laurel Dress,
I got more serious about my romance with this dress. I began playing around with a small pattern replica, imagining how I might manipulate my sloper*.

Since then, my summer frock dreams came true. I drafted a pattern for my Irish Laurel Dress, and sewed her up too. I've worn this perfect summer frock several times and really enjoyed the feel and flow of the garment. I'm already looking forward to using and altering this pattern again.

I talk about creating Fiona in my September Enchanted by Sewing Audio Podcast** - Remember you can either download Enchanted by Sewing audio shows from iTunes OR you can just listen right on the web (while sewing perhaps?). Links for both will be in the show notes, as they always are.

(Listen to the Fiona Show right on the web by clicking on this link)


~ ~ ~
* Initial Blue Sky Plans for Fiona - http://meencantacoser.blogspot.com/2015/08/romancing-my-summery-irish-laurel-dress.html Playing with a small version of a sloper pattern was a great way to envision the actual pattern work.

** Stop by the shownotes for the Enchanted by Sewing Podcast and sign up to get an email abouut new monthly audio shows. Or subscribe in iTunes.  http://www.enchantedbysewing.blogspot.com/

Farewell to Summer - Romancing Fiona, the Irish Laurel Dress (Part 2/2 -Termindado!)

Fiona, the Irish Laurel Dress
Fiona is made from a yellow green Linen-Rayon blend, lined with Bemberg rayon.
This dress has a one piece front and one piece back.
It includes front bust darts, back shoulder darts and partial darts that open like tucks in the torso front and back. The bodice above the dart/tucks is quite fitted.
The kissing zipper is prick-stitched.

I started day dreaming about creating Fiona at the beginning of summer. Then  in Fiona, my Summery Irish Laurel Dress,
I got more serious about my romance with this dress. I began playing around with a small pattern replica, imagining how I might manipulate my sloper*.

Since then, my summer frock dreams came true. I drafted a pattern for my Irish Laurel Dress, and sewed her up too. I've worn this perfect summer frock several times and really enjoyed the feel and flow of the garment. I'm already looking forward to using and altering this pattern again.

I talk about creating Fiona in my September Enchanted by Sewing Audio Podcast** - Remember you can either download Enchanted by Sewing audio shows from iTunes OR you can just listen right on the web (while sewing perhaps?). Links for both will be in the show notes, as they always are.

(Listen to the Fiona Show right on the web by clicking on this link)


~ ~ ~
* Initial Blue Sky Plans for Fiona - http://meencantacoser.blogspot.com/2015/08/romancing-my-summery-irish-laurel-dress.html Playing with a small version of a sloper pattern was a great way to envision the actual pattern work.

** Stop by the shownotes for the Enchanted by Sewing Podcast and sign up to get an email abouut new monthly audio shows. Or subscribe in iTunes.  http://www.enchantedbysewing.blogspot.com/

Monday, August 10, 2015

Ench By Sew-36: Fiona, the Irish Laurel Dress


Dress creation brings out the romantic in me. When I looked ahead to my summer sewing, I thought if I could sew only one garment for the season, it would be a dress. Fiona, the Irish Laurel dress, satisfied my yearning to design and sew the perfect summer frock.

Hey let’s listen to the show! To do that you can either download the ‘cast from iTunes - Click on this link to iTunes  , 
*OR* listen directly on the web, by clicking on this link
* * *

This dress was a very satisfying project for my arty romantic style

In between sewing summer essentials - shorts and tees - I worked off and on to determine what design lines spoke to me about summer, mock up a miniature sloper pattern to test my ideas, draft a pattern from my sloper, and then finally to sew up Fiona, while summer was still on!


* Pensamientos Primeros - Thinking through my idea for this summer dress
     - Part 1 - Planning Fiona
        - Part 2 - Farewell to Summer Romancing Fiona, the Irish Laurel Dress  
*Technicos - Pattern Drafting and Kissing Zipper using a Prick Stitch

*Pensamientos Finales - Fiona's Design Lines have roots in my own history

Finians Rainbow was a modern American fairy tale. It expressed late 1960's dreams for racial harmony and folks coming together. Fred Astaire (Finian McLonigan) and Petula Clark(his daughter Sharon) added in the romance of America seen, and idealized, fresh from Irish eyes. The story of Finian's determination to plant himself a crop of Irish gold, intertwined with romance of countryside and a new happpily-ever-after love for Sharon draws me in as well today as it did when I was a kid who'd only recently arrived in a new place myself. Any wonder that the movie's costumes inspire my pattern work and sewing today?


Visit Me Encanta Coster/Enchanted by Sewing - my regular sewing blog for other summer sewing I enjoyed along the way... in between time spent bringing Fiona to life

Monday, August 3, 2015

Romancing my Summery Irish Laurel Dress- Pattern Blue Sky (Part 1)

It's fun looking back at what led to the creation of Fiona, my newly finished Irish Laurel dress. I'm going to talk about this new frock over the course of several blog postings, as I recall what led to the pattern draft, pattern choice, and spirit of the dress. I also plan to dedicate a podcast to Fiona. I'm not sure if I'll produce that 'cast as my August or September show. You can signup at http://enchantedBySewing.blogspot.com to get email notification when new podcasts are released.

I began work on Fiona using a quarter scale sloper pattern, which I traced from a sewing book. There are a lot of slopers on the web that I could have printed out as well.

 My sloper has a bust dart and fisheye front dart like this one.

I wanted Fiona to be empire waisted, but I didn't want to simply gather a high-waited skirt under the bust. 

Design Goals
1) Sleeveless
2) Empire waist
3) One-piece front (and back).
4) Very fitted bodice
5) Pattern with very simple lines
6)  A light, floating and easy feeling summery dress

It really helped working in quarter scale. 

a) Initially I cut apart the bodice below the bust, creating a second, separate torso piece. Then I cut another line at the waist.

b) Notice that I pinned in the bust dart (goal 4) and put some padding under it to give me the sense of a three-dimensional garment. That also shows where a skirt would attach to the stitching line, so I know how long to make the seam line for any pattern piece that might be separate would need to be. 

In this case, as you can see from the curved line I extended the pattern at this below-the-bust point, so that was not an issue. If I were cutting a separate skirt piece, it would be.

c) I then cut apart the skirt as though I were creating a flared skirt pattern. I blogged about making a flared skirt from a sloper shortly after I finished my "French Pattern Drafting" class with Lynda Maynard. This is the first chance I've had to actually make a flared skirt. Of course this flared skirt will not hang from the waist, but I figured it was the same idea.

d) After I taped up the flared skirt - by closing the waist dart and pulling the skirt apart to accommodate that - I graded down from just below the bust (where I cut the pattern apart) to the side seam of the skirt in the area of the full hip. That's the slightly curved line you see drawn in.

Later on, when I created the actual full-sized pattern based on my sloper. I didn't cut apart the bodice, though I did cut away the skirt at the natural waistline, reforming the full front by judicious taping and pattern paper insertion. I did cut several lines to accommodate dart movement however.

Another thought, if this were a really complex pattern, would be to use some kind of small dress form just to do the pattern work without the fit. I'm not sure if this quarter-size would fit a large doll, but it might. Or you could rework this mini-sloper to fit a large doll. Madeline Vionnet used to drape patterns on a fashion doll. 

If the doll represented a child, I'd need to pad it out to represent a more womanly figure. It would be fun to try - if life were only all about sewing!

Saturday, July 11, 2015

Sewing Summer Essentials - Singing the Blues Tee

My newly created Singing the Blues Tee Creation


I'll work for you.
I'll slave for you.
I'll be a begger, or a knave for you.
If that isn't love, it will have to do.
Until the real thing comes along!
Billie Holiday knew how to sing the blues! https://en.wikipedia.org/wiki/Billie_Holiday

 I'm continuing to work with the tee shirt pattern I drafted from the moulage I created in my French Pattern Drafting class. Who can't use another comfortable, pretty, feel good tee over the summer?
  

Sewing summer essentials keeps me from 
feeling blue,
 even when I find myself singing them.

Saturday, June 27, 2015

Terminado! Rose Embellished Straight Skirt - My Own Pattern Work


Man alive, I can't believe I finally finished sewing this skirt! Hey my hair isn't really this red! I was cleaning up the light in the photo and my hair color changed!
Seems like I've had the embellishment inspiration for this skirt skirt, pinned to my Sewing Inspiration board  forever. Of course, I have one or two other items on that board as well -  ok, I think over 600 garments-  and I might just not make all of them!

Basics -
1) I drafted the pattern as a straight skirt, using my sloper. Here's how I did the pattern work.

2) I got together with my buddy Susan and had a lot of discussion about whether or not to put the two layers of ruffle on both front and back or just front - we agreed front only. It's a heavy embellishment.

3) I was using a slight-stretch denim from my fabric inventory. Hummmm while the no-waistband look is flattering  - that is a challenge. Don't want the waist slipping over time, especially with the heavy embellishment. So...I did two things

  a) I cut a partial lining out of heavy utility twill fabric. I both sewed it in and also tacked it down along the waistline to help the skirt hold it's shape. 
  b) Also.... I stayed the waist, by running a grosgrain (or was it a petersham?) ribbon along the inside of the waistline, tightened it so it's a touch shorter than the waist circumfernce, then sewed that in place along the waistline as well.

Hopefully that waist is not going anywhere it isn't supposed to now. We'll see over time how the fit works. I got the ribbon stay idea from my Bustier claass.

I really like the fit of this skirt
My Skirt's Rose Embellishment

4) The Embellishment took a while to work out. A lot of laying, pinning (safety pins as well as straight pins)  and hummmming went on. Good to have Susan around while I did that. I turned up the denim ruffle edges only once and used a faux-serger stitch (I don't have a serger but I have decorative stitches that mimic some of the concepts), Too much bulk for a twice turned hem on the ruffles.

The rose was just challenging. I also spent a lot of time with the original photo of the rose on the embellishment garment (*), thinking about how what percentage of the height of my skirt, that rose, and the ruffle trim,  should cover. Too big and we're talking Carmen Miranda - which is fine if that is what you going for. Also getting the folds within the rose center was tricky. If I were to recreate this skirt, I might use a mid-weight denim. I used a heavy weight here.


* Inspired By (a different style of denim skirt I was only interested in the embellishment) - https://www.pinterest.com/pin/565624034426847818/


Sunday, May 24, 2015

Ench By Sew-32: Parlez Vous French Pattern Drafting?

The May Enchanted By Sewing, Episode 32 Audio Show is Up ! 

Listening Option 1: Download from iTunes
Click on this link to iTunes  to download this and other Enchanted by Sewing shows to your mobile device (iPhone, Android, etc.) free from iTunes

Listening Option 2: Direct Download/Listen on the Web

I first signed up for Lynda Maynards' French Pattern Drafting Class to help me improve my fit and alteration of commercial patterns and was surprised to find that Lynda's class opened my eyes to the idea of drafting my own patterns - an aspect of sewing I’d never expected I’d get involved with, and frankly considered beyond my skills.

Studying with a teacher like Lynda and being inspired to try new things – that’s the kind of thing that keeps me, enchanted by sewing!

1) Pensamientos Primeros – The Art of French Pattern Drafting


My Pattern Work Postings

Early Days in Pattern Drafting Class - Includes Kenneth King Link http://meencantacoser.blogspot.com/2015/02/drafting-my-back-block-learning-pattern.html

More from Class http://meencantacoser.blogspot.com/2015/02/french-pattern-draftingmoulage-first.html 
and

http://meencantacoser.blogspot.com/2015/03/fitting-in-sleeve-sloper-pattern-work.html
 Using My Sloper and Moulage to Draft Patterns
http://meencantacoser.blogspot.com/2015/04/pattern-workparlez-vous-tee-shirt.html

http://meencantacoser.blogspot.com/2015/04/damson-plumm-private-eye-nibbled-that.html
     Parlez Vous Flared Skirt? http://meencantacoser.blogspot.com/2015/04/pattern-work-parlez-vous-flared-skirt.html
 

Pattern Work on Pinterest:Links to many pattern drafting and design resources  https://www.pinterest.com/lrshimer/0-sewing-pattern-work/

2) Technicos  - On Wearing Ease Going from a Moulage to a Sloper and Back Again
http://meencantacoser.blogspot.com/2015/05/parlez-vous-wearing-ease-moulage-to.html

3) Pensamientos Finales – My sloper...A garment for any occasion?
 

Sunday, April 12, 2015

Damson Plumm Private Eye - Nibbled That Tee


Damson Plumm Private Eye is, as you might imagine, inspired by bounty hunter Stephanie Plum
Remember when I blogged about Lynda Maynard's French Pattern Drafting class starting to pay off? Yes, I am indeed mighty happy with this plum purple tee shirt I created from a pattern I drafted myself. It was based on nibbling away at  the moulage fitting pattern that came out of Lynda's class. I also really like the royal plum-purple rib knit that I used to make the tee. Can you believe I found this material in my fabric inventory? ( Fabric inventory sounds so much better than fabric stash.)

What did I learn while creating this tee? 1) Don't fit the front and back first and then add the sleeve. I thought this top fit so perfectly, after mocking up just the front and back, that I sewed over the basting stitches in the side seams and then went on to
a) Redraft the sleeve pattern- making it much narrower
b) Cut out the reduced size sleeve
c) Sew those nice narrow sleeves in.

Uh oh....Taking in those side seams would have been fine, if I'd wanted a sleeveless tee, but I didn't.

Hardy har har - you should have seen my arms looking like sausages, unable to move. And we all know how fun it is to pick stitches out of knit fabric!
2) So, good thing, I had already learned to  ... cut super wide seam allowances when I'm playing with new patterns I draft myself. Thank goodness I had made my seam allowances 1 and 1/4 inches wide. I wouldn't have had enough fabric to rework the underarm seams on my sleeves otherwise- because of course I'd redrafted the sleeve to be so much narrower, after I'd fitted the front and back together, taking in the side seam allowances by quite a lot (smaller than the original moulage indicated).
3) Even though I wasn't in the mood, I measured all the changes I made on this tee and prepped a complete new pattern, all ready to try out on another tee project. Because another thing I've learned is that I don't always remember what changes I made, and I can't always find the last garment I made from a pattern when I go to use it.

  ~ ~ ~
Damson Plum is, as you might imagine, inspired by bounty hunter Stephanie Plum. Stephanie is younger than me, even funnier than me and has a grandmother who drives a hard-working gal crazy, but I still identify with her.

Damson Plumm Private Eye is inspired by bounty hunter Stephanie Plum.
Way back when, I created a Damson Plumm Private Eye label for my home made plum jam (using my home grown damson plums). And now, thanks to my new pattern drafting skills, I've drafted the pattern for, and sewn, my own Damson Plum Private Eye tee shirt. I'm sure it's the plum-purple that Damson always wears, that helps her crack those tough cases.


Sunday, March 29, 2015

Romancing the Dress - Periwinkle Blue Anjelica Cotton Knit Cutie

Laurel in Anjelica at San Francisco Legion of Honor
Did You Make That? 

Yep!

I 'm pretty pleased with this new periwinkle blue cotton knit dress I sewed, using one of the many  patterns included in my recently purchased  Famous Frocks: The Little Black Dress: Patterns for 20 Garments Inspired by Fashion Icons. I'm pretty cautious about buying books with included patterns (what if I only like one?) , but I find the entire book very inspirational, and I'm envisioning sewing several of the other dresses.

This romantically styled frock is the "Anjelica Jolie" dress. I used the darts and no-sleeve styling from the top variation, and the straight of grain and cotton knit from the dress version. I tried wearing a narrow belt at the true waist, but it looked awful on me - it just didn't suit my H-shaped figure. Also I think, maybe, it's too blousy at the top to suit a woman with more bust if it's belted too low. Emphasizing the bosom with a wide belt worn just below the bust line looks better. Sometimes I just have to try every belt and waistline in my wardrobe to get it right. This is the belt I created for my peaches and cream shirtwaist dress. It's 3 inch wide black elastic with a simple slider no-tongue belt buckle.

I felt very Cinderlla-ish wearing this dress to the San Francisco Legion of Honor museum this last week, especially since I was going to see a fashion exhibit, High Style, The Broklyn Museum Costume Collection. I got a nice compliment from the young woman who rented the audio head set. She liked it that I had dressed up for the exhibit. I enjoyed that being dressed up feeling, and I was really comfortable too. I'm thinking this light frock will be nice for travel, what do you think?

Yes, this book is inspiring me to make more. I've already begun making a muslin for the princess-seamed Princess Diana sheath dress and I have my eyes on the Grace Kelly dress, based on one she wore, and I loved, in the classic Alfred Hitchcock movie, Rear Window. Do you remember the scene towards the end, where Lisa (Grace) hides her Vogue magazine inside a very studious looking hardback book to fake Jimmy Stewart into thinking she's getting serious about important issues?

If I sew each of these, that's three patterns. I interested in trying the variations on them as well - some of which aren't typical of what you'd find in a pattern envelope. I'm going to try the top variation for this Anjelica pattern (in a woven) as well. I'm attracted to a couple of the other patterns, particularly the Coco Channel jersey dress, in the sleeveless variation. My guess is that I'll be sewing at least half the patterns in the book, if not more.

One thing I found great about using patterns from this book,versus buying an individual pattern, is that there  is an extensive part of the book that covers sewing techniques. These are different than just following directions from a pattern instruction sheet, because they help me to better develop my overall sewing skills, and I'm not blindly following steps that I might not understand. Once I've used two or three of these patterns, the cost of the book compares favorably with the purchase of the same number of pattern (even with pattern discounts), and the educational sewing skill-building advantage makes it worth more to me, than buying those individual patterns.


Friday, February 20, 2015

French Pattern Drafting/Moulage: First Muslin Test of Back and Front Blocks

I detailed what I'm learning about  in my Moulage/French Pattern Drafting class with Lynda, in this post http://meencantacoser.blogspot.com/2015/02/drafting-my-back-block-learning-pattern.html
I added a sort of modesty skirt below the full hip line
Other ladies wore leggings or just winged it in their
intimate garments

This week....I zipped myself carefully into the muslin test I created from my back and front blocks, for Moulage class. Uh oh, I sewed the zipper inside out! I thought Lynda Maynard wanted our seams and darts on the outside.
Guess who wasn't listening properly in class last time?

A buddy in class managed to get the zipper tab up for me.
Not too many changes, but I still need to make those few, and make a new muslin for next week. I'm in good company though. I think there were only one or two people who didn't need Lynda to tweak theirs.

How about those lips?
I had the goofiest look on my face
I kind of like these lips I borrowed!

Sunday, February 8, 2015

Drafting my Back Block - Learning Pattern Work with Moulage/French Pattern Drafting

Version 1 of my Back Pattern Block Draft
I'm taking Lynda Maynard's Moulage class at Cañada College. Moulage is the traditional style of pattern drafting used in France. Lynda studied pattern drafting, among other things, with Kenneth King. We're using a printed version of Kenneth King's Moulage book. 

On the web I can only find Kenneth King's Moulage Book on CD http://www.kennethdking.com/book/#moulage

We'll be creating a skin-tight, fitted moulage and then a sloper - a moulage that includes minimal wearing ease. We'll also be drafting sleeve patterns/slopers to work with these. My sewing buddy Susan and I, are very excited about those sleeves! Susan was featured in last month's Enchanted By Sewing Audio/Podcast - A Very Fitting Sewing Day With Susan

We've begun by drafting our back pattern blocks.

To get to this point, we followed Kenneth King's/Lynda's directions. Those included:

1) Taking careful measurements of, and recording, many dimensions of our bodies - front and back. I think there are about 20 measurements between our neck to the floor, with most of them centering around the torso. This is not something you can do for yourself. You need at least one buddy. It reminded me of the measurements we took when we made our dress form kits. (I produced a podcast about creating Dress Forms)

2) Using these measurements in a number of formulas, to create a sheet of calculations. Again we made a careful record. It was definitely worth my time to triple-check that I had
a) transferred the right measurement into the formula
b) done the math correctly
We rounded up all of our math to the nearest 1/8'th of an inch. 1/8'th of an inch is the smallest measurement on most rulers.
The book includes metric directions as well.
3) Next we followed  Kenneth King's/Lynda's directions to draft the back block you see here, using the calculations. Once more I'm went back and triple-checked, to be sure I was using the correct calculations in my draft.

Lynda reviewed our work not only for correctness, but also to make adjustments for various figure types. She adjusted the line in many of our shoulder drafts down at an angle. I'd guess that you might see the need for this later on in the process, if you're doing this work on your own.

Next we'll be drafting our front block.

After that, we'll work up a version in muslin.

This is one of those processes that takes a lot more time than I'd expect, but it's going to be well worth it for me.

My goals for the class are:

A) To make a new fit garment for my dress form, Conchita. I'll also be removing some of Conchita's padding and batting, to fill out that fit garment correctly. Gosh, wouldn't it be great if it were that straightforward for people to lose weight?

B) To create clear plastic transparencies I can use when altering commercial patterns. Lynda says the material she uses for this is from Tap PlasticsTap  Plastics:
24 1/2"  by  45"  by  .020  smooth/matte  polypropylene  sheet  SKU#20346)

C) Down the road... I might use these block in some way, in conjunction with draping my own patterns

Learning more about what makes patterns come together is the kind of thing that keeps me . . .
Enchanted by Sewing!
~ ~ ~
My Buddy Susan and I share what we've each learned about getting a good fit with our sewing patterns. In Last month's Enchanted By Sewing Audio/Podcast  Susan described key things she learned from sewing fit classes (Also we had a lot of fun chatting) A Very Fitting Sewing Day With Susan (Download or just listen on Line) http://enchantedbysewing.blogspot.com/2015/01/ench-by-sew-028-very-fitting-sewing-day.html

Enchanted By Sewing Audio/Podcast - Dress Forms (Download or just listen on Line) 
http://enchantedbysewing.blogspot.com/2013/09/ench-by-sew-12-dress-forms.html


Followers