Art Journal

Nature Ramblings ~ Past Times Time Travel ~ Romancing Daily Life
Showing posts with label class. Show all posts

Saturday, July 25, 2015

How To Invite Fairies to Live in your Garden (Tutorial)


Fairy magic adds enchantment to my gardening life


Wegman's Nursey ( Redwood City)  helped me prepare for fairies

How To Invite Fairies to Live in your Garden
Ice plant and succulents enhance this tea party garden

1)Find a nice pot - I got mine in my Wegman's Fairy Garden Class /Workshop.
 You might get creative here and re-purpose a pot, large bowl, can, or any open vessel you already have. Fairies are not picky. Make sure you have a hole in the bottom, or some kind of drainage.
2) Fill the pot nearly full with potting soil

3) Decide on a story you want to tell in your garden - the sleeping green fairy below had a very warm bike ride to a cool lake. He parked his cycle, walked across the stepping stones over the lake, and is enjoying a  snooze next to some frog friends on a leaf that's big enough to serve all of them as a little island bench in the lake
4) Pick out a few little outdoor or indoor plants to enhance the story. Tiny ground cover  plants might work well. In my Wegman's class, I included Australian violets/Australian bluebell and some Irish moss. I had some spider plants at home that had shot out spider plant babies, so I added several of those as well. 

In other fairy habitats - such as the tea party themed one above - I've been using (flowering) ice plant, thyme and a lot of the succulents I've been repurposing from pots. With these I often use pea gravel to fill in as a natural stream or landscape. Non-miniature plants like geranium/pelargonium and iris stems can stand in for trees.

5) Find a fairy, and some items that she or he might enjoy. I used a
There are Fairies at  the Bottom of My Garden
fairy, a leaf bridge with frogs, and a fairy bicycle. You could also use little toys - like tiny dolls. You don't even have to include a fairy. Just creating the perfect environment , may well encourage a fairy to move in with you. Just because you don't see one, doesn't mean they aren't living there.
 6) Rocks, gravel, broken pottery shards, sand and other textures add greatly to the story. In the Fairy Garden class I went too we had access to crushed blue and green glass (you can buy bags of it) and broken shards from a turquoise pot. Those items made me think lake when I spotted them.
Waiting for fairies Just because you don't see them, doesn't mean they aren't living there.
Fairy garden is in-progress - keeping my eyes peeled for additions
If children live in or visit your house, make sure they have access to and maintenance rights over the fairy garden.

My fairy gardens live on my patio. I hand water them when it gets dry. Small garden like these are great during our drought, because they takes very little water. In fact, when we often re-purpose leftover water from other domestic events for watering our pots.

Books
Both these Disney Garden books inspire my theme gardening style, which is so vital for a fairy gardener. I like the tabbed-cookbook style of DISNEY'S GARDENING WITH MICKEY when I want to quickly review the steps for creating a hanging basket or well illustrated how-tos for small topiaries. (There's lots of good info for larger topiaries and garden sculpting as well - I just haven't tried it out) In addition, there is good gardening (yard or pots) basic techniques as well as many recommendations for plants that work well for specific themes and temperatures. I highly recommend it, because I have used it a lot over a period of several years.

I also turn regularly to my Secrets of Disney's Glorious Gardens book. It has a lot of similar techniques and information as DISNEY'S GARDENING WITH MICKEY and it also has lovely, lovely photos that inspire me. So when I want to sit down and just get ideas for themes or gardening styles, I pour through the photos in this book.
                
Fairy magic is adding enchantment to my life, when it comes to gardening.

~ ~ ~
There are Fairies at the Bottom of My Garden

Saturday, July 4, 2015

There are Fairies at the Bottom of My Garden-California Patio Garden that is)


Fairy magic adds  enchantment to my gardening lif
There are fairies at the bottom of our garden!
They often have a dance on summer nights;
The butterflies and bees
Make a lovely little breeze,
And the rabbits stand about and hold the lights.
Did you know that they could sit upon the moonbeams
And pick a little star to make a fan,
And dance away up there
In the middle of the air
Well, they can!


There are fairies at the bottom of our garden!
You cannot think how beautiful they are;
They all stand up and sing
When the fairy queen and king
Come gently floating down upon their car.
The king is very proud and handsome;
The queen, now can you guess who that would be?
She's a little girl all day
But at night she steals away.
Well, it's me!
      "There are Fairies at the Bottom of our Garden" - Liza Lehmann, 1917
https://en.wikipedia.org/wiki/Liza_Lehmann

Enjoy the Comedy Julie Andrews singing There are Fairies at the Bottom of Our Garden


Fairy magic adds  enchantment to my gardening life


Friday, March 13, 2015

Fitting in the Sleeve Sloper (Pattern Work)


First I made my moulage.

Then I made my sloper.

They looked a lot alike, so I only blogged about my moulage. Here are the most recent details I wrote about that Lynda Maynard class in this posting.

We've been working on getting a sleeve to fit into our slopers for two classes now. And I'm continuing to work at that fit and pattern drafting task at home. 

This is not the most attractive garment I've ever sewn!
It's a sloper, which is the equivalent of my moulage plus wearing ease.
Yes, I know I've got too much ease in my sleeve at this point
After I made more change at home, and before I went back to creating
a new version of the pattern, I did the math -
The total distance around the sleeve stitching line for the
armscye/sleeve cap, should be 3/4 of an inch
larger than the distance for the front and back arm holes.

Can you see the work that went into my first shot at drafting a sleeve pattern?
I also write small to do lists on the pattern piece and use a lot of color coding and
 dating to remind myself of what I did in class versus at home, etc.
This is the follow on to the drafting block by the way.
I re-scooped the front, flattening it and giving it less curve, added to the height at
the top center to get the bicep balance line to come out parallel to the floor,
and also added 3/8 of an inch to both the long underarm seam lines.

After making all those changes, I definitely needed a new version of my pattern!
After I made this, I traced out a new sleeve to cut out and sew to try on the other side
of my muslin sloper.

Still To Do 

before class
Next - I'll be stay stitching my second muslin sleeve, cutting it out, basting the balance lines, completing the underarm seam line, and basting in the ease lines.

Then I need to go back to my sloper and alter my side seams to be 5/8 of an inch farther into the seam allowance. I have 1 plus inch seam allowances.

Must remember to note that change on my sloper pattern! Good thing I haven't cut out my most recent version of that pattern, so I can draw that in and use my eraser and still have a clean final working copy.

Entonces I 'll attach the sleeve to the other side of my sloper, making sure my front is attached to the front part of my sloper fit garment, of course!

At that point I'll check all the balance lines in the mirror and see if I need to alter any thing else obvious before I return to class next week. I included a slightly over 1" seam allowance when I drew the pattern markings on, so I can make some alterations.

I create a new version of all my patterns every week after class. That way I have a record of where I've been and what I've done. I can go back to a previous version too. Also it's just less confusing and it motivates me to write more notes on my patterns.

I also include my name, date, phone number and email (I've smudged those out in these photo)
on every single pattern piece and muslin garment. 
In sewing lab, everybody's stuff looks the same and it's a lot of work down the drain 
if I misplace anything.
~ ~ ~
It's not exciting or glamorous working on creating a perfect-fit-me garment, but it sure leads to a lot of daydreaming about what I'll work on once I have the patterns that result from this process.

And that's the kind of thing that keeps me ....
Enchanted by Sewing!

   ]

Fitting in the Sleeve Sloper (Pattern Work)

First I made my moulage.

Then I made my sloper.

They looked a lot alike, so I only blogged about my moulage. Here are the most recent details I wrote about that Lynda Maynard class in this posting.

We've been working on getting a sleeve to fit into our slopers for two classes now. And I'm continuing to work at that fit and pattern drafting task at home. 

This is not the most attractive garment I've ever sewn!
It's a sloper, which is the equivalent of my moulage plus wearing ease.
Yes, I know I've got too much ease in my sleeve at this point
After I made more change at home, and before I went back to creating
a new version of the pattern, I did the math -
The total distance around the sleeve stitching line for the
armscye/sleeve cap, should be 3/4 of an inch
larger than the distance for the front and back arm holes.

Can you see the work that went into my first shot at drafting a sleeve pattern?
I also write small to do lists on the pattern piece and use a lot of color coding and
 dating to remind myself of what I did in class versus at home, etc.
This is the follow on to the drafting block by the way.
I re-scooped the front, flattening it and giving it less curve, added to the height at
the top center to get the bicep balance line to come out parallel to the floor,
and also added 3/8 of an inch to both the long underarm seam lines.

After making all those changes, I definitely needed a new version of my pattern!
After I made this, I traced out a new sleeve to cut out and sew to try on the other side
of my muslin sloper.
Still To Do 
before class
Next - I'll be stay stitching my second muslin sleeve, cutting it out, basting the balance lines, completing the underarm seam line, and basting in the ease lines.

Then I need to go back to my sloper and alter my side seams to be 5/8 of an inch farther into the seam allowance. I have 1 plus inch seam allowances.

Must remember to note that change on my sloper pattern! Good thing I haven't cut out my most recent version of that pattern, so I can draw that in and use my eraser and still have a clean final working copy.

Entonces I 'll attach the sleeve to the other side of my sloper, making sure my front is attached to the front part of my sloper fit garment, of course!

At that point I'll check all the balance lines in the mirror and see if I need to alter any thing else obvious before I return to class next week. I included a slightly over 1" seam allowance when I drew the pattern markings on, so I can make some alterations.

I create a new version of all my patterns every week after class. That way I have a record of where I've been and what I've done. I can go back to a previous version too. Also it's just less confusing and it motivates me to write more notes on my patterns.

I also include my name, date, phone number and email (I've smudged those out in these photo)
on every single pattern piece and muslin garment. 
In sewing lab, everybody's stuff looks the same and it's a lot of work down the drain 
if I misplace anything.
~ ~ ~
It's not exciting or glamorous working on creating a perfect-fit-me garment, but it sure leads to a lot of daydreaming about what I'll work on once I have the patterns that result from this process.

And that's the kind of thing that keeps me ....
Enchanted by Sewing!

Friday, February 20, 2015

French Pattern Drafting/Moulage: First Muslin Test of Back and Front Blocks

I detailed what I'm learning about  in my Moulage/French Pattern Drafting class with Lynda, in this post http://meencantacoser.blogspot.com/2015/02/drafting-my-back-block-learning-pattern.html
I added a sort of modesty skirt below the full hip line
Other ladies wore leggings or just winged it in their
intimate garments

This week....I zipped myself carefully into the muslin test I created from my back and front blocks, for Moulage class. Uh oh, I sewed the zipper inside out! I thought Lynda Maynard wanted our seams and darts on the outside.
Guess who wasn't listening properly in class last time?

A buddy in class managed to get the zipper tab up for me.
Not too many changes, but I still need to make those few, and make a new muslin for next week. I'm in good company though. I think there were only one or two people who didn't need Lynda to tweak theirs.

How about those lips?
I had the goofiest look on my face
I kind of like these lips I borrowed!

Monday, February 16, 2015

Black Cloche Straw - My New Everyday Downton Abbey Hat

Inspiration for my new black straw cloche
came from several of  the Downton Abbey hats I've pinned on my
Hats and Other Millinery board
This is one of three hats I made in a fantastic 3-day hat blocking workshop in Wayne Wichern's Burlingame studio. earlier in the month. I've got a tiny bit more sewing to finish off the trim on one other, and will be posting about that, and the other I made, soon in this blog (when I score some cute photos - which is always such a challenge!)

When I pin different hats on my " Hats and Other Millinery" board on Pinterest, I often notice people saying that they wished they had reasons to wear hats, or that hats looked right with the clothes they actually wear as modern folks. I like making hats that actually do fit in with my life style. This black straw cloche has already gone on a number of walks with me and I loved wearing it. Yup, I still put on my SPF 50 sunscreen too!

This cloche, and one of the other hats I made at Wayne's, are definitely inspired by ones I saw on Downton Abbey. I brought photos from my pinterest board into class with me and Wayne helped me pick out hat blocks from his collection of nearly 1,000 vintage hat forms, to find similarly styled blocks. For my third hat I chose a combination of two blocks to create a classic fedora. All three hats are absolutely practical for my modern day life, and will be heading out on many walks with me, just like the ones that Sybil, Mary and Edith wore daily at Downton Abbey.

This is the second class I've taken with Wayne. I blogged about the first one which I took at Cañada College last year, in my post, Matters Millinery. Am I planning more visits with Wayne? Oh yes! He has open labs for folks who've taken these three day labs, and I already have hopes of making a 30's inspired visor in a colorful wool.

Wayne Wichern''s studio is in Burlingame is in the San Francisco Bay Area - on the Penninsula near the San Francisco Airport. Classes like Wayne's aren't a typical activity in most areas. If I lived outside the area, I'd consider setting aside funds to take a mini vacation for one of these workshops. He usually teaches them once a month. You can email him to discuss integrating one of his classes into your schedule. And let me know if you're coming!
~ ~ ~
Web Resources

Matters Millinery http://meencantacoser.blogspot.com/2013/09/matters-millinery-making-my-own-hats.html

My "Hats and Other Millinery" board on Pinterest https://www.pinterest.com/lrshimer/hats-and-other-millinary/

Wayne's Workshop Schedule - Burlingame CA (San Mateo County, San Francisco Bay Area) http://www.waynewichernmillinery.com

Saturday, January 25, 2014

Bustiers: Not a Corset! (Plus Free Printable Ephemera)

This imaginary bustier is the inspiration for my bustier class project. I plan to create my first bustier in dark blue denim, with an exposed zipper.  The pink roses on this illustration, are simply a princess touch for this bookmark/luggage tag*!

Since I started Lynda Maynard's bustier sewing class at Cañada, I've been pinning a lot of bustiers, imagining what I hope to sew myself.

There's some confusion out on the web about the difference between a bustier and a corset (I think some images that I've pinned may really be corsets, but the fabric and embellishments are so pretty I can't resist!). Here's what Lynda taught us about the difference between these two garments.


A Bustier 
... derives it's shape from the figure

A Corset
 ... imposes a shape on the figure. A corset compresses and reforms the  figure, usually diminishing it by at least three inches. (And yes those three inches have to go somewhere!)

~ ~ ~
Resources

Laurel's Bustiers Board on Pinterest : http://www.pinterest.com/lrshimer/sewingbustiersinspiration/

And stop by and check out some of my other sewing boards! http://www.pinterest.com/lrshimer/

Cañada College Fashion Program, Redwood City, CA
http://canadacollegefashion.com

Lynda Maynard
http://canadacollegefashion.com/blog/2013/11/instructor-lynda-maynard/

Bustiers: Class Pattern
~ ~ ~
Printable Ephemera

Feel free to drag the bustier graphic off to your desktop, and print it to use as a bookmark or luggage tag. I insert mine into a Word file , duplicating several of the images on one page and sometimes resizing it to fit the document boundaries. Then I print those images on card stock paper. I hole punch the marker at the top, and loop a piece of decorative ribbon through that. A few beads or pearls on the end of the ribbon would add a lovely touch!


Smaller Size for Printing
Larger Size for Printing


Saturday, January 18, 2014

Technicos: Show it Off and Be Proud!

Sometimes I'm really tempted to note in this journal all the stuff I'm not happy with in my sewing projects like.....
- The quality or composition of the photo (or both)
- How I stood or where I was, when wearing it for the photo!
- The fit of the garment - It's never perfect!
- My sewing technique
- The color just isn't me
- The fabric is cheesy, or not right for the style
- The style is not flattering for me, or maybe for anyone
- the list could go on and on

But I don't! The art of presentation is just one more technique I've picked up from sewing class.

In class we always have a presentation day at the end and/or middle of the semester. On that great day, we stand up in front of everybody and show off our creations. And of course, quite often, half or more of the class tells you everything that's wrong with their work ...
This makes me look fat! I should have increased the seam allowance by 1/4 inch.
Usually these $30 Vogue pattern ensembles are perfect for me, but I wish I'd chosen another pattern. 
This expensive, silk charmeuse fabric was really hard to sew with, and so I made a lot of mistakes. I mean look at this hem! Look at these seams! 
I spent so long on the pattern and it fit fine in the muslin, but when I cut it out in my fabric, it looks awful. And I didn't have time to do anything else but make this thing I'm never going to wear.

Then it's my turn to stand up. I think to myself .. Gee their fabric is much more luxurious than the budget stuff I used. They finished every seam on the inside and pick-stitched their zipper. Their figure is model-perfect and they can wear styles that fits like a glove! If they think that about their garment, they're just going to laugh at mine.

Then I remember what I practiced saying to myself, stand up straight and tall. No matter what I think of the garment at this point - and I'm often pretty sick of it (!) - I say something like this...
I bet we've all sewn the
Bee-Bop dress at one
time or another!

Wow, I just love this Bee-Bop dress. I thought the pattern looked great when I saw it on the freebie counter, and  knew it would be perfect for this yellow and virulent green polyester caterpillar print I've had in my fabric inventory since somebody gave it to me back in 1972! It's got such a vintage look and I'm really looking forward to wearing it to my next college reunion. 

And the funny thing is, that suddenly the Bee-Bop dress starts to look kind of cute and people are complimenting me on it.

Sometimes, it's putting on the right attitude that keeps me....
Enchanted by Sewing 

Thursday, December 5, 2013

Christmas Tutu 1 (Blue Sky Sewing)

A Christmas Tutu
Sewn in the Imagination of  LR Shimer
What I'm actually working on sewing 'wise, is my final Draping Class assignment. I'm at that hard point where I'm still creating a pattern and it looks nothing like what I originally planned to make. Funny how that is.

I'm under the pressure of a deadline to finish up that pattern and sew the garment it represents. It's just as well to have those deadlines from a class, of course, because it makes me quit changing my mind and focus on completion. Creating can be like that - Drape or cut bait* I guess.

A little fantasy sewing is definitely in order when I'm getting a little fussy about completing a project. I love daydreaming about all the other things I could be creating, but had better not be distracted by. The more impractical those projects are, the better they are for soothing any concerns over finishing up a challenging task.

Big on my fantasy sewing list this year, is a Christmas tutu. I actually do hope to learn to how to sew a tutu in the future, though probably not in 2014. One thing that inspires me to participate in this lush world of costuming is this youtube video from the costume shop at New York City Ballet.

My love of tutus is also inspired by daydreaming about the art of the ballet. When I was writing My Heart Beats Faster in Past Times, I was entranced by the scene where Larissa explores the beauties of the Lilac Fairy's classic romantic tutu, and helping the little ballerina prepare for that role in a performance of the Sleeping Beauty Ballet. It was one of those times when I didn't need to think about what to write, I just let the people in the story take it away, and the words came out.

One day I will sew a tutu. 
It will be worthy of dancing in the Sleeping Beauty. 
It's knowing that sewing fantasies can become real, that keep me...
Enchanted by Sewing


Resources
I love to pin tutus and other ballet related pages. Check out my virtual bulletin board at ... http://www.pinterest.com/lrshimer/tutus/

* If English isn't your first language, I'm referring to the idiomatic phrase "Fish or cut bait." It means stop daydreaming and finish the task you're working on.


Saturday, October 19, 2013

Regency Romance Novel Cover is Not the Assignment! Historic Inspired Draping

I was thinking Regency Romance Novel Cover
When I draped this bodice
But I was supposed to be thinking about
working with the circles!
This is not what my draping teacher was looking for - at all - when she had us draping with circles in class.

I finally pulled off a project she was happier with ("More organic. Work with the circle."), but I can't seem to help having this dress-my-Barbie-doll reaction when somebody tells me to get creative with fabric and form. 

What deep seated emotional problem does this mean I suffer from? And can I get my community to pay me to overcome it, so that I can buy more fabric and notions?
:-)


Playing with materials in draping class keeps me...
Enchanted by Sewing!

Monday, September 30, 2013

Thursday, September 26, 2013

Ench By Sew-12 Creating Dress Forms (Podcast Episode)

Co-Published with the Show Notes for Enchanted By Sewing


Hey! The latest Enchanted by Sewing Podcast has been published!
Two Ways to Listen
i)You can listen to the show right on the web by clicking on the this link
** * * 
~ OR ~
ii)  Click on this link to iTunes  to download this and other Enchanted by Sewing shows to your mobile device (iPhone, Android, etc.) free from iTunes 
Did I miss any links mentioned in the show? If so, please post here and let me know, or else email me ,  EnchantedBySewing AT gmail
~~~
This month show is about my experiences creating and using two different types of dress forms - 
a) A duct tape dress form
b) A Uniquely You dress form
~ ~ ~

Please send your thoughts about this month or next month's topic – Jeans Sewing -in the Post a Comment section,  below :-)
~ ~ ~

Please Note
My Uniquely You Dress Form Instructor was Judith Jackson. I referred to her as "our teacher" in the original recording, as I was waiting to ask her permission to include her name. She said 'yes' :-)

In this month's show

1) What is a dress form?
a. A mannequin who’se shaped like you. A fitting or body double, a way to fit patterns, garments, drape and design as though you’re the tailor and the dress form is you
b. Listen to Lori's Sew Forth Now Podcast for a history of dress forms
Lori not only talked about history, she also talked about the style of dress form and I’m not repeating any of that. Please listen to her wonderful show (she said it would remain there for the near future) esp interesting to me is lori’s archeologic work, uncovering the history of dress forms.
Lori uses an adjustable dress form, I worked with two different types – duct tape and a Uniquely You dress form
c.
2) Why I wanted a dress form
a. Fit
b. Trying out patterns and muslins in 3D
c.  Create and play around with my own designs, and minor commercial pattern alterations and design changes
d.  Because Lori made them sound so appealing!
e. Maybe for photographing in my blog….

3) Body Issues and your Team
a. Body issues are a part of our culture
b. Find helpers/team who help us feel good about ourselves
c. A dress form helps us distance ourselves from body issues – it’s just data
d. A dress form helps us notice our best features – what do I want to flatter more?
e. A dress form helps us make patterns or garments we design ourselves more flattering, so we learn to play up our best features
f. A dress form allows us to experiment with a muslin/toile – Can I make a shirtwaist that flatters my figure type?
g. Choosing our Team

4) Two types of dress forms I experienced. Basically what they are,  

5) Cost

6) Materials (tools)   and Resources (web stuff) - I list some Resources below

7) Safety- Working around kids,  young or older goofy, fun loving kids - Two good reasons not to !
8) Social Comfort/Body Issues – You need a work group, at least one other person. Find someone who supports your best interests and helps you feel good about yourself
9) How I’ve used my dress forms , what other things I or others might do w/ them
 - Fitting, altering, trying out new patterns, hand sewing/deconstructed neckbands - helps me conform neckline to lay well on me
- A Wedding in your future? Formal/Special Occasion Wear I would guess that if you’re doing a formal dress for someone with beading or close fitting - and maybe they aren't available at the drop of a hat, might be worth making a duct tape (or other type )  dress form for them


10) Technicos: In-depth details about how I made these two different styles of dress forms. What I actually did to create them

~ ~ ~
Resources

Listen to the Podcast on web - no need to download to a mobile device
http://traffic.libsyn.com/enchantedbysewing/draft5_dress_formENCHANTEDbySewingFINAL.mp3

There are so many fun things about dress forms - making them, draping on them,  displaying historic, artistic and other garments on them, and enjoying them as an art form - whether full sized, half size, miniature or doll size. There are even topiary forms inspired by dress forms. Whenever I see a good dress form that fits any of these categories, I pin it on one of my virtual bulletin boards http://www.pinterest.com/lrshimer/dress-forms/

Lori recorded a Sew Forth Now podcast episode on dress forms. I tried not to duplicate anything she already talked about in this great show

Dress forms are a popular theme with sewing bloggers 

"Threads" Magazine has many articles related to dress forms

Quick and Easy Duct-Tape Dress Form


Some people think Paper Tape works better than duct tape. Haven't tried it myself, but I'd be game!
      http://www.threadsmagazine.com/item/3633/paper-tape-dress-form Paper Tape Dress Form


Kenneth King make an extra body to use for two people  in Threads issue 161
 June/July 2012


I looked in the Threads Magazine Archive to find different articles. You can find that at...
http://www.tauntonstore.com/threads-magazine-issues.html  You can buy individual Threads back issues, if you or your public library doesn't have them on the shelf.


1) "Fit for Everyone" by Kenneth D. King in issue #161. This describes how to sew removable covers to make your dress form work for multiple figures.
A. "Tip: Meet Madeline" by Sandy Moeckel in issue #153. This tip describes how Sandy inexpensively made her dress form suitable for herself as well as her daughter.
1) "Tip: Identical Body Double" by Anne K. Brenz in issue #144. This tip describes the way Anne made her dress form fit her every curve.
"The Dress Form–A Sewer's Best Friend" by Carol Fresia in issue #123. Described below.
"Make An Arm for Your Dress Form" by Shirley Botsford in issue #90.
"Clone Yourself a Fitting Assistant" by David Page Coffin in issue #75. This article explains how to make a dress form from scratch.

~ ~ ~
Things I might try out for arty fun and practice with my dress form 


Making a newspaper dress on a dress form. Fun way to learn draping?


tutu might also be a fun way to experiment with draping on a dress form too "How to make a tutu out of paper" http://www.youtube.com/watch?v=qp6nKpzd0eI

Monday, September 9, 2013

Matters Millinery - Making My Own Hats

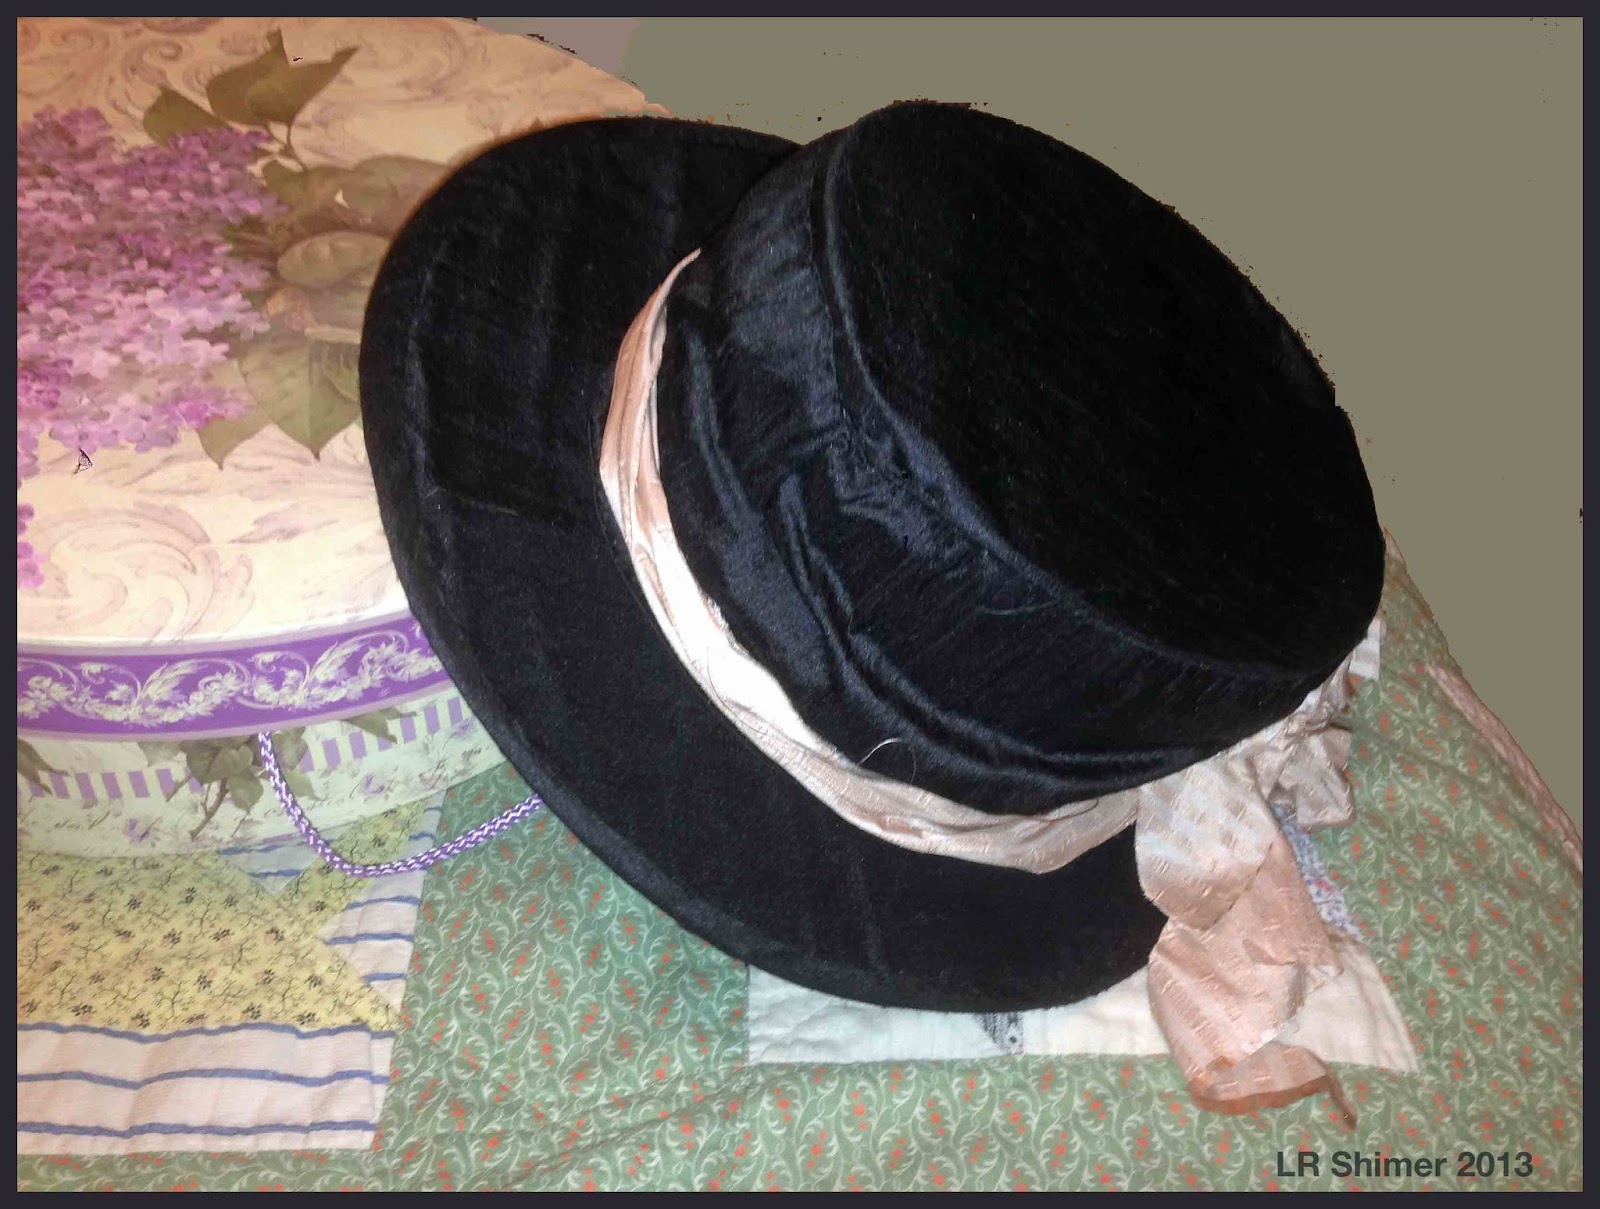
I created this fabric covered buckram hat
from black silk dupioni in Wayne Wichern's class.
The pink silk band and bow makes  a nice looking trim,
but so far I've only worn it plain.
Have you ever read the fascinating book The Mismeasure of Man by Stephen Jay Gould? The author presents stories about the historical study of phrenology (the Victorian idea of a noble brow is a typical example of phrenology). One aspect of phrenology was that researchers tried to prove that head size was linked to mental superiority.

It didn't pan out.

I'd love to think that my larger than normal head means I have an extra measure of brains. But according to Gould, that's not the case. About the only thing my 24.5 inch head size does for me is make it impossible to find a woman's hat that fits. Gals are supposed to have 22.5 inch head circumferences. Hence the Minnie Mouse look whenever I try on a cute hat. Over the counter hats perch up on top of my curls, making me a perfect cartoon model.

But of course, being a sewist, I can make my own hats and leave Minnie's at Disneyland.
~ ~ ~
You may have read a posting I wrote last fall called "Chewing a Bun with Tuppence" (http://meencantacoser.blogspot.com/2012/06/caps-off-chewing-bun-with-tuppence.html )  about the first fabric cap I made. I also wrote about another cap I made, using the same pattern a month or so later. I wear one or the other of these caps every single day. They protect my skin better than a regular baseball cap and are a lot cuter too! 

But I wanted to know how to make more than caps. I wanted to be able to make a structured hat.


I like my black silk duping hat plain
I took Wayne Wichern's Millinery class at Cañada College last spring. It was a lovely three-session, weekend class, perfect for full-time workers who want to squeeze in some creative time with recreational and artistic sewing. We had a lot of fun chatting while we stitched away - the majority of this kind of sewing is by hand. By the way, Wayne is not only a fun person, he's also a great teacher.


Most of our time in class was devoted to making fabric-covered buckram hats. I made a simple style in black silk dupioni. I played around with trims for this hat, but mostly I like it plain. It will be easy enough to add trims anytime in the future. I bought the fabric at Thai Silks in Los Altos. If you stop by their shop, ask about special discounts for fashion students and Cañada fashion students. It's a really nice store. They've been there a long time and have a good reputation in the area. They sell online too.

We also learned about the process of making straw hats. We didn't have the resources and room to block our own, but we gave Wayne our measurements, choose colors and styles and he blocked them for us.  We did the really hard part - we trimmed them with ribbons, lace and anything else we could come up with :-) So now I have a straw hat that fits, in addition to my black silk hat!

In addition we made fascinators or cocktail hats. I gave mine to Holly the Dolly to use as a regular doll's hat. I'll put up a picture of that in a future posting.
~ ~ ~
We loved showing off our creations at the reunion
in Wayne Wichern's Burlingame studio
In late summer Wayne invited us to his Burlingame studio for a follow-up party where we showed off our creations. Wayne teaches a variety of workshops in his studio. If you live in the area, or might come for a visit, I can promise you'll have a wonderful time in this sociable setting. Warning! These popular workshops fill quickly.
~ ~ ~

Whenever I see an appealing hat, cocktail hat or fascinator on the web, I pin it to http://www.pinterest.com/lrshimer/hats-and-other-millinary/

Wayne Wichern Millinery http://www.waynewichernmillinery.com

Wayne's Workshop Schedule - Burlingame CA (San Mateo County, San Francisco Bay Area)
http://www.waynewichernmillinery.com/MillineryWorkshops2012.htm

Thai Silks
252 State Street, Lost Altos, CA
http://www.thaisilks.com


Friday, September 6, 2013

Draping With a New Retro Friend

Eventually I'll be draping on my own
Uniquely You dress form, but for the first few assignments
we use the school's forms.
I fee very lucky to be matched up with this lovely
lady, created in 1965.
This year I created and began to use both a duct tape, and Uniquely You dress form. These new fitting companions have helped me to fit patterns, muslins, and garments.

I learned so much getting started with these dress forms, that my September Enchanted by Sewing Podcast show, will be about what I've learned creating and using these dress forms. 

Still, there's more to come.

This fall I'm taking the Draping class at Cañada college. There I'll be learning the art of draping, and I can see that it truly is an art. I'm just beginning to develop my eye, use my fingers to smooth the fabric as I drape, and starting to learn where the material is telling those fingers it should go. It's pretty exciting to think that by the end of the semester, I should know enough to draft some of my own patterns - patterns that are made just for me, by me!

We're using the Connie Crawford Art of Draping book. I've listened several times to the Sew Forth Now podcast, where Lori interviewed Ms. Crawford (Sew Forth Now #35: The Industry) and enjoyed the story of how this very experienced woman came to create this book.

The dress form I'm currently using in class (I'll be using my own Uniquely You dress form later on in the semester) is a 1965 model. Just think how many students have learned to drape and sew with her! I compared her with some of the newer forms, and noticed that she is, as our teacher says "perkier". That is, her bust is more enhanced than other more modern dress forms. Yup, shapely chests were popular in the middle of that decade.


I'm so pleased I've been teamed with this retro 60's gal. 
It's sewing companions and classes like this that keep me....
Enchanted by Sewing
* * *
You can find Lori's interview with Connie Crawford on the Sew Forth Now Podcast  

Followers