Art Journal
Nature Ramblings ~ Past Times Time Travel ~ Romancing Daily Life
Showing posts with label Laurel Shimer. Show all posts
Sunday, January 31, 2016
Journal Notes- Downton Abbey - Positive Ending Note
Labels:
BBC,
CA,
California,
create,
Downton Abbey,
end,
farewell,
hats,
Laurel Shimer,
millinery,
PBS,
sew,
sewing,
sewist,
story,
story telling
Monday, January 25, 2016
Samplers - Early Blogs
Labels:
Antique,
blogs,
embellish,
embroidery,
History,
Laurel Shimer,
Metropoliton Museum of Art,
New York,
NYC,
old time,
samplers,
sew,
sewing
Saturday, January 9, 2016
NYC Haiku: Stopoff at the Natural History Museum
Labels:
. Manhattan,
Laurel Shimer,
Natural History Museum,
NYC,
subway,
tile
Monday, December 14, 2015
Windy with Rainbows Part 1- San Francisco Ghirardhelii Square
Labels:
Christmas,
dog,
dog friendly,
Ghirardheli Square,
holiday,
Laurel Shimer,
long walk,
San Francisco,
San Francisco Bay Area,
slow travel,
travel,
walk
Thursday, December 10, 2015
Goof! Plaids and How NOT to Match 'Em!
| Hand basted the seams with fusible thread. All nicely lined up! |
| You can see the stitches, because not yet fused |
There must be a secret to the actual fusing, because all that happened was, that when I pressed the basted seams, the thread fused onto one of the seam lines, and disappeared from the other. I would have been better off, simply basting with regular thread, before doing my machine stitching.
| My lovely fusible basting thread melted into the fabric, but didn't meld the seams! |
Onward and upward. This is the reason we do sample sewing!
Posted in Crafter.... http://www.craftster.org/forum/index.php?board=391.0
Sunday, November 29, 2015
Pattern Work - Working For My Plaid - M6076 Princess Seamed - With Sleeves
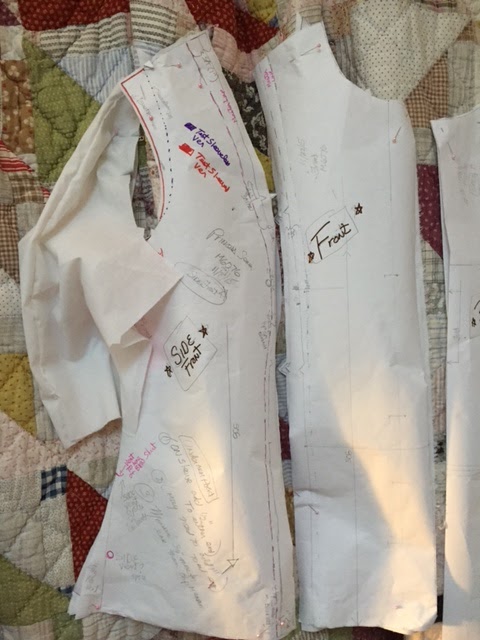
| Can't you just envision these pattern pieces and muslins as a red-plaid princess-seamed shirt? |
All four pattern pieces have a muslin attached. My next step is to transfer the seam lines onto the muslin, before I begin basting.
I drew those seam lines onto the pattern, based on the measurements I took from the sleeveless Western Winds shirt, which I created from this same pattern (altering to create a sleeved version as well as getting a good fit for me). I've really enjoyed wearing Western Winds and got quite a lot of late summer/early fall use out of that shirt - of course here in California it stays warm longer than much of the U.S.
For Western Winds, I cut back the top of the shoulder towards the neck, but I've dropped that back in place for this sleeved version. My new pattern includes lines for both sleeved and sleeveless versions. I cut with room for either version, then use my clover wheel to lay down the armscye lines, then cut away what I don't need for the particular version I'm making.
For more description, see my previous post- Sleeved to Sleeveless.
There's a good chance I'll be making a few more changes to the muslin, and therefore pattern, before I snip into that red plaid. I also plan to re-test the new pattern on another sleeveless version, sometime over the next few months. Tried and true patterns take a while to get just so, but they sure are worth their weight in gold.
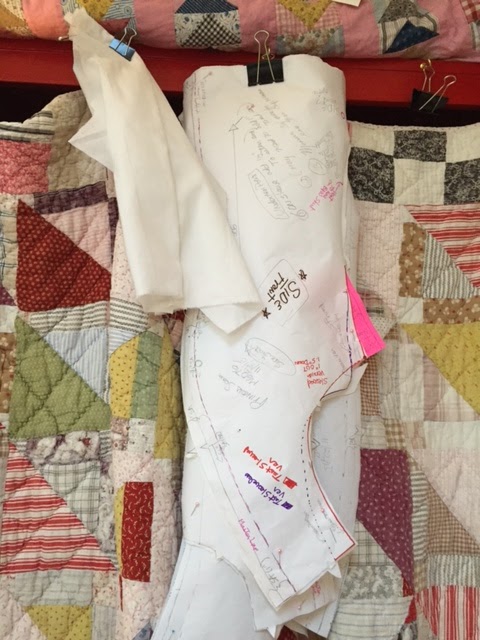
| I store in-progress muslins and pattern pieces clipped onto binder clips hanging off cup hooks. That way they don't get wrinkles in between sewing sessions, and they all stay together. |
Labels:
CA,
California,
enchanted by sewing podcast,
fit,
in-progress,
Laurel Shimer,
M6076,
muslin,
pattern work,
princess seam,
sew,
sewing,
sewist,
shirt,
slater,
sleeveless,
store,
tried and true,
west
Monday, November 9, 2015
Dogs! Good Excuse for Sewing Slow and Green (Scraps, Green Sewing)
![]() |
| Completing a pillow cover from dressmaking scraps is a real sewing accomplishment with the world's cutest dog around the house! |
Jasper
Yes - He adopted us four weeks ago
A great save-the-worlds-dogs organization - Lou was so helpful locating the right pooch for our household https://www.facebook.com/tiramisudogrescue/
About a year and a third old
Some kind of mix - maybe Australian Shepherd, Golden Retriever, and something with a curly tail
Oh Lordy, he is the sweetest dog I've ever known!
Yes, it is like having a new child in the house
Three-four walks a day - minimum
Haven't encountered a dog he doesn't like yet
Yes, Dog Park once a week Had our first hike Had our first beach trip
Jasper doesn't like it when I sit down at the sewing machine. He says "Hey, a walk would be better than that!"
And so we do.
Labels:
CA,
California,
dog,
green sewing,
Jasper,
Laurel Shimer,
pillow,
recycle,
remnents,
scraps,
sew,
sewing,
sewist
Thursday, October 22, 2015
Ench By Sew-37: Savage Beauty of Alexander McQueen (Halloween Style)
October is a month when many of us in the Western Hemisphere get in touch with our own emotions and comfort dealing with
Listen directly to this audio/podcast on the web by clicking on this link OR.... to download the show from iTunes Click on this link to iTunes ,
In our neighborhood we put out beautiful pumpkins, scary dancing skeletons and bright lights. Then we celebrate our connection to another world, by welcoming in the trick or treaters- be they costumed beautifully, colorfully, or gruesomely - by handing out free Halloween candy.Fashion designer Alexander McQueen focused on designing beautifully romantic, avent garde fashion. He also had a strong interest in the macabre. His masters fashion exhibit “Jack the Ripper Stalks His Victims”, was a hint that this emerging designer was not going to be run-of-the-mill when it came to setting his artistic tone. Other chilling exhibits followed. “Highland Rape” and “The Widows of Culloden” , among others, carried McQueen’s historically inspired fashion artistry farther into the dark side of the human soul.
Morose? Yes – often- but his work was also drop dead gorgeous. Many of McQueens materials, embellishments design lines, colors, technology and elements inspire my arty-romantic sewing nature, even as I am frightened by other aspects of his work.
As you accompany me in the show, I’ll share the beautiful, and the colorful as well as the scary. Because that’s what this time of year is all about, where I live.
Labels:
Alexander McQueen,
audio,
CA,
California,
England,
exhibit,
fashion,
goth,
Halloween,
Laurel Shimer,
London,
museum,
podcast,
Savage Beauty,
Steam Punk,
Victoria and Albert
Saturday, September 5, 2015
Still Holding a Torch for You (New York - Field Trip)
![]() |
| Remember folks, The Bronx is Up and the Battery's Down |
One of my favorite discoveries was learning that we got an excellent view of that celebrated Old Lady - a.k.a. The Statue of Liberty - from the cafeteria window at Ikea! Hey, don't you think the Old Gal must be getting tired of holding that torch up for everybody by now?
~ ~ ~ How to Acquire Apartment Furniture in NYC ~ ~ ~
Many of us are familiar with that new-apartment dwellers-shopping utopia, Ikea. Back home in California, we use our own car to load up our purchases. Over here in the land of 8.8 million people, it works a little differently for those without a car - which seems to be the majority.Here's how my daughter acquired an assembled bed, compact eating table with two chairs, and a desk.
- We called ahead to get advice on ordering on-web versus going to store. Nice man told us that if we ordered on-line, it would take two or three weeks, but that by visiting the store we could get a delivery date of our choice. Not wanting to sleep on the floor in Rosie's new apartment, we went to the store. - Give yourself a solid day. We went late morning Tuesday and it took us about four hours - though we did eat lunch first in the cafeteria. Yes, my daughter had already identified the names and product numbers for the furniture she wanted. Thank goodness.
- Locate the various free Ikea shuttle stops in (our case) lower Manhattan. You can take a bus or subway to those. The MTA website might help you find them. There is also a water taxi which, I believe, leaves from Wall Street. Sounds fun but we were too exhausted to locate it after we heard this fun fact in the Home Delivery line.
- You might want to pay to have your items pulled from the shelves in the self serve warehouse area. We did not. The mattresses were really shoved in tight and I was glad I'd had a nourishing lunch, as I slammed my body repeatedly against one to make way for another to come out. Other bed pieces were pretty durn heavy. Between the two of us we just managed it - oh and my daughter had a stress fracture on her foot. Normally here, I work on being her feet, but there we were - us and those big heavy cartons that had to get into the carts. I do not recommend moving in this temporarily disabled condition. Given that fracture, we should have paid the forty bucks to have somebody else pick the furniture.
- Once Rose paid for the furniture boxes we'd struggled to load into and onto two carts, we thought we were all set.
Har de har har.
It took an hour and a half to get through the Home Delivery line. Funny, it didn't look that long. But we moved at a snail's pace. It was like a Disneyland queue were they forgot to keep folks going.- Rosalinda got the date and delivery window of her choice. The two men that came, schlepped the stuff up her five flights of stairs, assembled the furniture, and carted the boxes back down to her recycling area, were really nice. I practiced my Spanish with one of them. The other, who spoke English as his first language, communicated effortlessly with his non-English speaking helper. He looked to be of Italian ancestry. I've noticed many, many non-Latino folks in the area speak excellent Spanish. No, I didn't know before that 25% of people in the area are of Hispanic ancestry.
- Flat delivery fee at this time was $99. What a deal! Rosie also paid for the assembly - I think it's calculated based on weight. I've seen my husband assemble Ikea beds before and knew it was a big job, so I was really glad we didn't have to deal with it on our first day in.
Labels:
apartment,
big apple,
field trip,
how to buy furniture,
Ikea,
Laurel Shimer,
Manhattan,
move,
New York,
New York City,
NYC,
shop,
Spanish,
Statue of LIberty,
temporary disability,
Upper East Side
Saturday, June 27, 2015
Terminado! Rose Embellished Straight Skirt - My Own Pattern Work
![]() |
| Man alive, I can't believe I finally finished sewing this skirt! Hey my hair isn't really this red! I was cleaning up the light in the photo and my hair color changed! |
Seems like I've had the embellishment inspiration for this skirt skirt, pinned to my Sewing Inspiration board forever. Of course, I have one or two other items on that board as well - ok, I think over 600 garments- and I might just not make all of them!
Basics -
1) I drafted the pattern as a straight skirt, using my sloper. Here's how I did the pattern work.
2) I got together with my buddy Susan and had a lot of discussion about whether or not to put the two layers of ruffle on both front and back or just front - we agreed front only. It's a heavy embellishment.
a) I cut a partial lining out of heavy utility twill fabric. I both sewed it in and also tacked it down along the waistline to help the skirt hold it's shape.
b) Also.... I stayed the waist, by running a grosgrain (or was it a petersham?) ribbon along the inside of the waistline, tightened it so it's a touch shorter than the waist circumfernce, then sewed that in place along the waistline as well.
Hopefully that waist is not going anywhere it isn't supposed to now. We'll see over time how the fit works. I got the ribbon stay idea from my Bustier claass.
I really like the fit of this skirt
![]() |
| My Skirt's Rose Embellishment |
4) The Embellishment took a while to work out. A lot of laying, pinning (safety pins as well as straight pins) and hummmming went on. Good to have Susan around while I did that. I turned up the denim ruffle edges only once and used a faux-serger stitch (I don't have a serger but I have decorative stitches that mimic some of the concepts), Too much bulk for a twice turned hem on the ruffles.
The rose was just challenging. I also spent a lot of time with the original photo of the rose on the embellishment garment (*), thinking about how what percentage of the height of my skirt, that rose, and the ruffle trim, should cover. Too big and we're talking Carmen Miranda - which is fine if that is what you going for. Also getting the folds within the rose center was tricky. If I were to recreate this skirt, I might use a mid-weight denim. I used a heavy weight here.
My Sewing Inspiration Board - https://www.pinterest.com/lrshimer/0sewing-inspiration/
* Inspired By (a different style of denim skirt I was only interested in the embellishment) - https://www.pinterest.com/pin/565624034426847818/
Labels:
CA,
California,
denim,
draft,
embellish,
embellishment,
Laurel Shimer,
pattern work,
Rose,
sew,
sewing,
sewist,
skirt,
sloper,
straight
Monday, June 22, 2015
Palo Alto Baylands
Labels:
baylands,
CA,
California,
Laurel Shimer,
marsh,
nature,
Palo Alto,
postcard from California,
Santa Clara County,
wild,
wildlife
Ench By Sew-33:Back in Town
Back in Town - A Summer State of Sewing
![]() | ||
| Victoria and Albert had their own ideas about what made for a happy couples vacation in the U.K., Just like we do |
Click on this link to iTunes to download this and other Enchanted by Sewing shows to your mobile device (iPhone, Android, etc.) free from iTunes
Listening Option 2: Direct Download/Listen on the Web
LISTEN RIGHT ON THE WEB (while sewing perhaps?) http://traffic.libsyn.com/enchantedbysewing/CastFINALBackInTownSummerJune2015.mp3
~ ~ ~
Hey! If you could sew only one garment this summer season, what would it be?
- Answer the Poll here
- Post your thoughts below
or
-Email me at EnchantedBySewing@Gmail.com
~ ~ ~
After three weeks vacation in England and Scotland, I'm not yet caught up and engaged in my sewing projects. I am, however, reflecting on historical and travel sewing inspiration from my trip, putting some good hard thought into planning sewing projects, and continuing to learn about working on my sewing pattern skills, using my sloper and moulage patterns.Quick Fashion: When it comes to a summer state of sewing sometimes I just want to zip zap up 3 tees in a tried and true pattern and never mind about careful seam finishes or hems – maybe a deconstructed neckline or too. Other times I want to focus on slow careful pattern work, practice my sewing techniques and create a garment that I expect to see me through a number of seasons.
Slow Fashion: I also like to put time into developing patterns with personally crafted fit, carefully finished seams and well-thought techniques.
Planned Sewing: Other times I need to step back from sewing and give my fabric and pattern inventory and choice of sewing projects a good solid overhaul.
This Month:
1) Field trip to England and Scotland
(7 days London, 5 days in Lake District (2 travel/3 self-guided walking holiday, 2+ days Edinburgh)
In and amongst our activities, I encountered textile and sewing information and inspiration.
For travel to use with audio books and in flight movies, and tired evenings, I took along hand embroidery, and practiced stitches on a piece of natural linen scrap. I took this lovely little book,
Embroidered & Embellished: 85 Stitches Using Thread, Floss, Ribbon, Beads & More • Step-by-Step Visual Guide
Many Wonderful Large London Museums are free: Victoria and Albert (free) (Fee for special Alexander McQueen exhibit – Savage Beauty)
~ ~ ~
Laurel Loves London (2013) http://enchantedbysewing.blogspot.com/2013/06/ench-by-sew-009-laurel-loves-london.htmlA Tour of the Victoria and Albert Fashion Gallery with Laurel (2013) http://enchantedbysewing.blogspot.com/2013/07/ench-by-sew-010-v-fashion-gallery-tour.html
~ ~ ~
Imperial War Museum (free) – Fashion on the Ration 1940s Street Style exhibit http://www.iwm.org.uk/exhibitions/iwm-london/fashion-on-the-rationMuseum of London (free)
The Queens Gallery (Moderate Cost - worth it) – painting paradise became scavenger hunt for pooches (get your ticket stamped for free return for a year)
Conversation Starters - Greeting friendly pooches and their people.
On our treks between museums and scenic places, we enjoyed greenery, statuary and ornamental waters, not to mention horses, dogs, people and kids, in the big parks Holland Park, Kensington Gardens, Regents Park, St James Park.
Mid Week break for More Green with Country Feel, easy access from London
Osterly Park (free estate/park area and/or paid access
to Neoclassical Robert Adam (Regency Era Architect/Designer) historic house and formal gardens) A good mid-week break - 30 minutes from Kensington by train -
https://en.wikipedia.org/wiki/Osterley_Park
Robert Adam ‘one of the most fashionable architects in Eng’ also designed furniture to match the rooms at Osterly, which they still have!
A Place Like Home - Agency we've used repeatedly to rent flats in London
Mickeldore - Self-guided walking holidays in England. They setup up the B&B, schlep your luggage and give you maps and directions. Well worth it. We have used for two or our three walking trips in the U.K. (They don't have a Cornwall trip or we would have used them for all 3!) http://www.mickledore.co.uk/
Wool - Lake District - We stayed at Askhill Farm B&B (http://www.loweswatercam.co.uk/Askhill_Farm_Stay.htm ) There, I learned a little something about current challenges in English wool market chatting with my hosts
Tartan Weaving Mill: Edinburgh On the Royal Mile, just down from The Castle Tartans /Plaids Weaving ( http://www.royal-mile.com/interest/tartanweavingmill.html) Sure, it's primarily a gift store, but there are tidbits for the fabric savy on more than one floor. Working looms.
Jaquard Loom and other Looms are on Display - National Museum of Scotland (Wonderful Museum) Extensive Exhibit area on textiles
2) Technicos: Fitted Tee Shirt – Sloper/Moulage to Pattern, Nibbled that Tee
Damson Plumm Private Eye Tee Shirt - Creating Pattern from Moulage
http://meencantacoser.blogspot.com/2015/04/damson-plumm-private-eye-nibbled-that.html
3) Purging – Pains and Pleasures - Please post your own thoughts
Is it worth it? You tell me
http://meencantacoser.blogspot.com/2015/06/purging-fabricpatternssewing-books.html
Purging - Fabric/Patterns/Sewing Books - Worth It?
You tell me. Is it worth it?
I've been purging my wardrobe, fabric inventory, pattern collection, and book shelves (including my sewing books). Is it worth it?
Email me and give me your opinion EnchantedBySewing@gmail.com
The Pains
1) I have a tendency to land on a piece of fabric and feel I should come up with a creative way to use it up, even if it’s not a garment or accessory I will get a lot of use or pleasure out of. Even more so when it takes more storage room!
2) But I’ve hung onto this for so long, and I might use it soon!
3) I hold onto things for sentimental reasons or associations with an occasion I made the item for
4) I hold onto fabric I meant to make up for my daughter when she was little. She’s 25 now. And she’s not planning to have children herself in the near future!
5) It’s really a lot of work! I’m using my sewing recreation time, and probably will be at it for a couple of months over the summer
The Pleasures
1) More room for my fabric I want to keep, so I can find what I want from what I already have
2) More room for fabric I buy – even though I’m trying hard to limit buying right now!
3) More chance to find patterns I use regularly when I get rid of those I don’t use and/or better organize my patterns
4) Less clothes in the closet helps me find the elusive garment I want, and enjoy my successful sewing projects more
5) Act of purging from my wardrobe, reminds me of what I really wear, and helps me best decide where to allocate my recreational sewing time
Labels:
books,
CA. California,
clean,
fabric,
hobby,
Laurel Shimer,
organize,
patterns,
purge,
sew,
sewing,
sewist,
stash
Sunday, May 24, 2015
Ench By Sew-32: Parlez Vous French Pattern Drafting?
The May Enchanted By Sewing, Episode 32 Audio Show is Up !
Listening Option 1: Download from iTunes
Click on this link to iTunes to download this and other Enchanted by Sewing shows to your mobile device (iPhone, Android, etc.) free from iTunes
Listening Option 2: Direct Download/Listen on the Web
I first signed up for Lynda Maynards' French Pattern Drafting Class to help me improve my fit and alteration of commercial patterns and was surprised to find that Lynda's class opened my eyes to the idea of drafting my own patterns - an aspect of sewing I’d never expected I’d get involved with, and frankly considered beyond my skills.
Studying with a teacher like Lynda and being inspired to try new things – that’s the kind of thing that keeps me, enchanted by sewing!
1) Pensamientos Primeros – The Art of French Pattern Drafting
More from Class http://meencantacoser.blogspot.com/2015/02/french-pattern-draftingmoulage-first.html
and
http://meencantacoser.blogspot.com/2015/03/fitting-in-sleeve-sloper-pattern-work.html
Pattern Work on Pinterest:Links to many pattern drafting and design resources https://www.pinterest.com/lrshimer/0-sewing-pattern-work/
2) Technicos - On Wearing Ease Going from a Moulage to a Sloper and Back Again
http://meencantacoser.blogspot.com/2015/05/parlez-vous-wearing-ease-moulage-to.html
3) Pensamientos Finales – My sloper...A garment for any occasion?
Listening Option 1: Download from iTunes
Click on this link to iTunes to download this and other Enchanted by Sewing shows to your mobile device (iPhone, Android, etc.) free from iTunes
Listening Option 2: Direct Download/Listen on the Web
I first signed up for Lynda Maynards' French Pattern Drafting Class to help me improve my fit and alteration of commercial patterns and was surprised to find that Lynda's class opened my eyes to the idea of drafting my own patterns - an aspect of sewing I’d never expected I’d get involved with, and frankly considered beyond my skills.
Studying with a teacher like Lynda and being inspired to try new things – that’s the kind of thing that keeps me, enchanted by sewing!
1) Pensamientos Primeros – The Art of French Pattern Drafting
My Pattern Work Postings
Early Days in Pattern Drafting Class - Includes Kenneth King Link http://meencantacoser.blogspot.com/2015/02/drafting-my-back-block-learning-pattern.html
and
http://meencantacoser.blogspot.com/2015/03/fitting-in-sleeve-sloper-pattern-work.html
Using My Sloper and Moulage to Draft Patterns
http://meencantacoser.blogspot.com/2015/04/pattern-workparlez-vous-tee-shirt.html
http://meencantacoser.blogspot.com/2015/04/damson-plumm-private-eye-nibbled-that.html
Parlez Vous Flared Skirt? http://meencantacoser.blogspot.com/2015/04/pattern-work-parlez-vous-flared-skirt.htmlPattern Work on Pinterest:Links to many pattern drafting and design resources https://www.pinterest.com/lrshimer/0-sewing-pattern-work/
2) Technicos - On Wearing Ease Going from a Moulage to a Sloper and Back Again
http://meencantacoser.blogspot.com/2015/05/parlez-vous-wearing-ease-moulage-to.html
3) Pensamientos Finales – My sloper...A garment for any occasion?
Labels:
draft,
flat pattern,
french pattern drafting,
Kenneth King,
Laurel Shimer,
LYnda Maynard,
moulage,
pattern,
pattern drafting,
pattern work,
sew,
sewing,
sewist,
sloper
Saturday, May 16, 2015
Parlez Vous Wearing Ease - Moulage to Sloper and Back Again
Moulage (Blue Dots) To Sloper (Purple Lines)
And Back Again
1 | 2 | 3 | 4 | 5 | 6 | 7 | |
Back | Drop 1/8” | -> shoulder ¼” | Raise 1/8” + -> ¼” | Out ½” | Out 5/8” | Out 3/8 – ½” | Out ½” |
Front | Drop 1/2” | -> shoulder ¼” | Raise 1/8” + -> ¼” | Out 3/8” | Out 5/8” | Out 3/8 – ½” | Out ½” |
I used my moulage pattern (blue dots) I created from Lynda Maynard's French Pattern Drafting class to draft my Damson Plumm Private Eye tee shirt. I used my sloper pattern (purple lines) to create the straight skirt pattern I'm using for a denim skirt I'm currently sewing.
1 (CF/CB)
2 (shoulder point –neck)
3 (shoulder point – armhole side)
4 (midway armhole curve)
5 (end of armhole below arm)
6 (armhole point to waist)
7 (waist to full hip)
Labels:
CA,
California,
change,
french,
french pattern drafting,
Laurel Shimer,
moulage,
pattern drafting,
sew,
sewing,
sewist,
sloper,
wearing ease
Friday, March 13, 2015
Fitting in the Sleeve Sloper (Pattern Work)
First I made my moulage. Then I made my sloper. They looked a lot alike, so I only blogged about my moulage. Here are the most recent details I wrote about that Lynda Maynard class in this posting. We've been working on getting a sleeve to fit into our slopers for two classes now. And I'm continuing to work at that fit and pattern drafting task at home. ![]() |
| This is not the most attractive garment I've ever sewn! It's a sloper, which is the equivalent of my moulage plus wearing ease. Yes, I know I've got too much ease in my sleeve at this point After I made more change at home, and before I went back to creating a new version of the pattern, I did the math - The total distance around the sleeve stitching line for the armscye/sleeve cap, should be 3/4 of an inch larger than the distance for the front and back arm holes. |
![]() |
| After making all those changes, I definitely needed a new version of my pattern! After I made this, I traced out a new sleeve to cut out and sew to try on the other side of my muslin sloper. |
Still To Do
before class
Next - I'll be stay stitching my second muslin sleeve, cutting it out, basting the balance lines, completing the underarm seam line, and basting in the ease lines.Then I need to go back to my sloper and alter my side seams to be 5/8 of an inch farther into the seam allowance. I have 1 plus inch seam allowances.
Must remember to note that change on my sloper pattern! Good thing I haven't cut out my most recent version of that pattern, so I can draw that in and use my eraser and still have a clean final working copy.
Entonces I 'll attach the sleeve to the other side of my sloper, making sure my front is attached to the front part of my sloper fit garment, of course!
At that point I'll check all the balance lines in the mirror and see if I need to alter any thing else obvious before I return to class next week. I included a slightly over 1" seam allowance when I drew the pattern markings on, so I can make some alterations.
I create a new version of all my patterns every week after class. That way I have a record of where I've been and what I've done. I can go back to a previous version too. Also it's just less confusing and it motivates me to write more notes on my patterns.
I also include my name, date, phone number and email (I've smudged those out in these photo)
on every single pattern piece and muslin garment.
In sewing lab, everybody's stuff looks the same and it's a lot of work down the drain
if I misplace anything.
~ ~ ~
It's not exciting or glamorous working on creating a perfect-fit-me garment, but it sure leads to a lot of daydreaming about what I'll work on once I have the patterns that result from this process.And that's the kind of thing that keeps me ....
Enchanted by Sewing!
]
]
Labels:
CA,
California,
class,
fashion,
fit,
garment,
Kenneth King,
Laurel Shimer,
LYnda Maynard,
moulage,
sew,
sewing,
sewist,
sleeve,
sloper
Fitting in the Sleeve Sloper (Pattern Work)
First I made my moulage. Then I made my sloper. They looked a lot alike, so I only blogged about my moulage. Here are the most recent details I wrote about that Lynda Maynard class in this posting. We've been working on getting a sleeve to fit into our slopers for two classes now. And I'm continuing to work at that fit and pattern drafting task at home. ![]() |
| This is not the most attractive garment I've ever sewn! It's a sloper, which is the equivalent of my moulage plus wearing ease. Yes, I know I've got too much ease in my sleeve at this point After I made more change at home, and before I went back to creating a new version of the pattern, I did the math - The total distance around the sleeve stitching line for the armscye/sleeve cap, should be 3/4 of an inch larger than the distance for the front and back arm holes. |
![]() |
| After making all those changes, I definitely needed a new version of my pattern! After I made this, I traced out a new sleeve to cut out and sew to try on the other side of my muslin sloper. |
Still To Do
before class
Next - I'll be stay stitching my second muslin sleeve, cutting it out, basting the balance lines, completing the underarm seam line, and basting in the ease lines.Then I need to go back to my sloper and alter my side seams to be 5/8 of an inch farther into the seam allowance. I have 1 plus inch seam allowances.
Must remember to note that change on my sloper pattern! Good thing I haven't cut out my most recent version of that pattern, so I can draw that in and use my eraser and still have a clean final working copy.
Entonces I 'll attach the sleeve to the other side of my sloper, making sure my front is attached to the front part of my sloper fit garment, of course!
At that point I'll check all the balance lines in the mirror and see if I need to alter any thing else obvious before I return to class next week. I included a slightly over 1" seam allowance when I drew the pattern markings on, so I can make some alterations.
I create a new version of all my patterns every week after class. That way I have a record of where I've been and what I've done. I can go back to a previous version too. Also it's just less confusing and it motivates me to write more notes on my patterns.
I also include my name, date, phone number and email (I've smudged those out in these photo)
on every single pattern piece and muslin garment.
In sewing lab, everybody's stuff looks the same and it's a lot of work down the drain
if I misplace anything.
~ ~ ~
It's not exciting or glamorous working on creating a perfect-fit-me garment, but it sure leads to a lot of daydreaming about what I'll work on once I have the patterns that result from this process.And that's the kind of thing that keeps me ....
Enchanted by Sewing!
Labels:
CA,
California,
class,
fashion,
fit,
garment,
Kenneth King,
Laurel Shimer,
LYnda Maynard,
moulage,
sew,
sewing,
sewist,
sleeve,
sloper
Subscribe to:
Posts (Atom)