Art Journal

Nature Ramblings ~ Past Times Time Travel ~ Romancing Daily Life

Saturday, January 4, 2014

Technicos: Strip Strap Sewing With Ease (Spaghetti Straps - No Tube Turner Tool)


I have made spaghetti straps or fabric tubes using a standard tube turner tool. But I much prefer this technique. I may have learned about it originally, in a reader letter in Threads magazine, but I'm not sure. I just know I've made a lot of fabric tubes this way with very little fuss. However I don't hear about other sewists making them this way. 

Maybe you'll like doing them this way like I do. And you will never have to figure out where you last put your tube turner again:-)


Resources
Fabric - A strip somewhat longer than you actually need. It should be more than twice as wide as the tube/spaghetti strap you want. In fact, if X is the width of the desired strap and S is the amount of seam allowance you are going to use it should be 2X+S wide. 

For example - If I want a tube 1/2 and inch wide and I plan to sew a 5/8 inch seam allowance, then my fabric strip should be 1 and 5/8 inches wide, because (2 x 1/2) + 5/8 = 1 5/8

If I need a total of oh say, 72 inches of tubing, I would probably add another 5 inches just to be on the safe side. (That's very conservative). Because I will be cutting away some of the end of my tube. 

String or an old piece of bias tape, or cord or other stringy thing that won't break apart easily . I keep a roll of packaging string around, but even jute string works. Just make sure the string/cord doesn't get sewn over as you sew along the long edge.

Cut your string/cord longer than your fabric piece. Add five inches total to be really safe.

1) With RIGHT SIDES TOGETHER- Press the length of fabric  you are making into a tube or spaghetti strap, in half down the middle, going the long way.
2) Lay the string/cord down the middle, right up
against the fold and away from the raw edge.
Leave a tail of string/cord sticking out
on both ends
of your fabric.


3) Sew back and forth over one end of the folded piece
securing the string/cord really well. You are going to be
cutting away this end later on, so you don't care
what it looks like. Just make sure the cord can't come out down here.
Also, make sure you leave a little tail end of the cord
hanging out beyond this stitching line to be
absolutely sure the string/cord doesn't pull away.


4) Now, keeping the string/cord on the fold side,
 sew along the long end of your tube.
Don't catch the cord in your stitches!

Leave the second short end open when you finish this long line of stitching.

Make sure you have another tail end sticking out of the open end of your tube! That's the second short end, the one opposite the one you secured so well back in step 3.

5) Trim along in the seam allowance, close to your stitching line.
You don't want fabric in the way of next step.


6) Start pulling on the end of the string/cord tail that's sticking out of your open end.
As you pull the fabric will ruffle up.
That's good!


Push those ruffles back toward the secured end as you keep pulling. Just work them along. They'll be a little hesitant, but you be the boss!

At a certain point you will be able to push the first bit of ruffled up fabric
up and over the original
short end you secured.

7) Oh look what's coming through!
There is the nice little fabric tube you've been looking for.
The seam allowance is on the inside!!!!
Keep pulling until it's all out.

When you're done you'll have a long piece of string
hanging off the secured end. Cut that secured end off now.
You might be able to reuse the string/cord for another tube,
if that tube is a little shorter than this one :-)

Wednesday, January 1, 2014

Drought: Deerweed for New Years (Hiking Edgewood)

Lotus scoparius is commonly known as deer weed
(click on the illustration for more fiery detail)

Hot, dry, New Years Day
Oh! Lotus scoparius 
Keeps Edgewood aflame

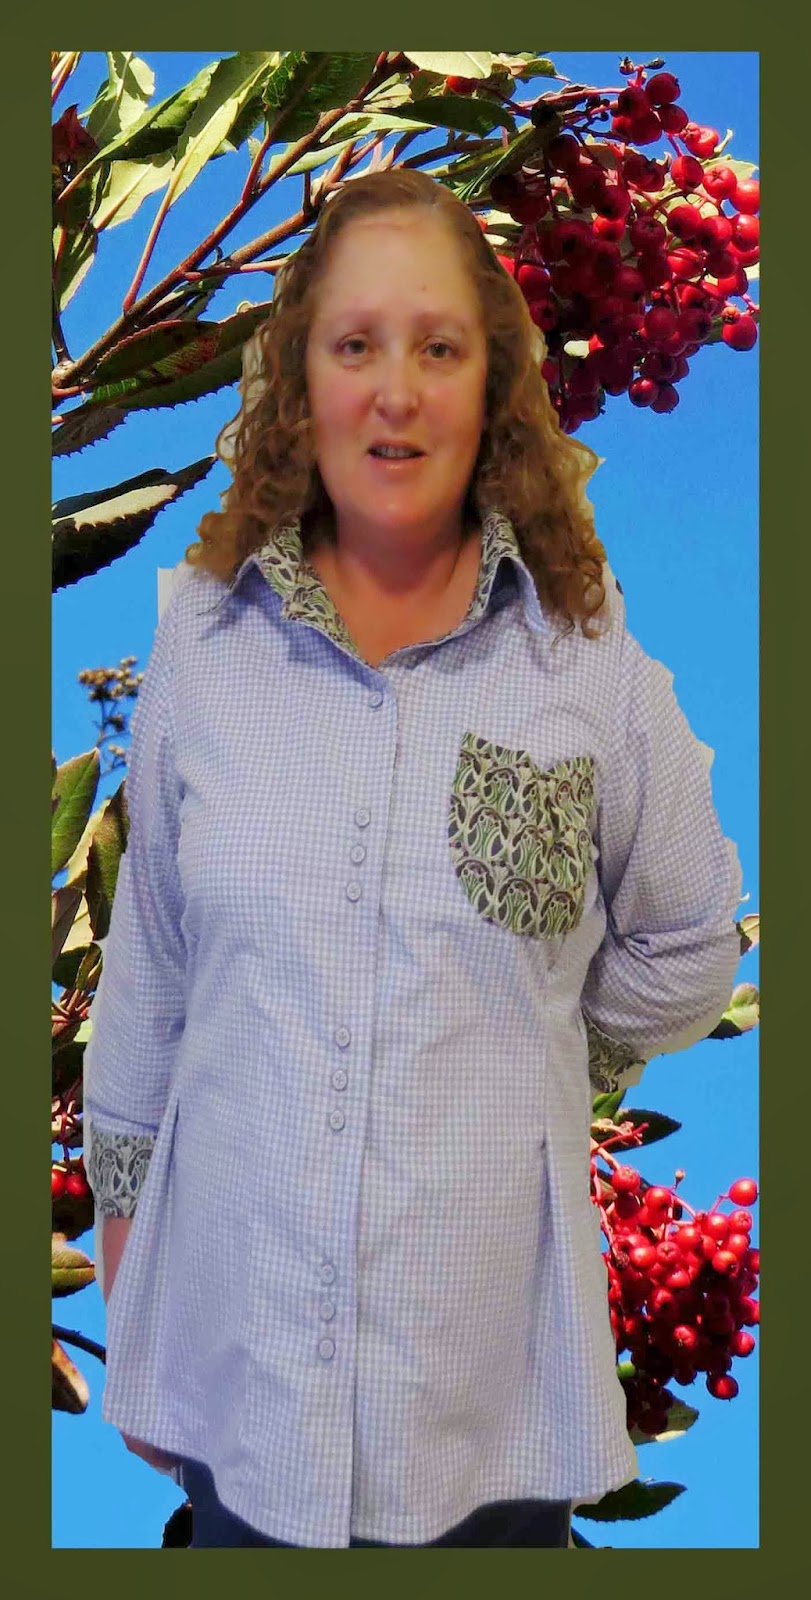
Terminado! Lilacs and Liberty - New Shirt for a New Year

This shirt symbolizes my plans for 2014. It's one of several projects, sewing and otherwise, that  I've been wanting to complete.

Finishing Lilacs and Liberty in time to wear it out to a movie on the last day of 2013, gave me a good feeling about starting the new year out right.

The lilacs part comes from the lilac gingham. The liberty because the accents are from one of the smaller pieces of Liberty Tana Lawn I bought on a trip to London. I wrote and podcasted about that trip in June. This Liberty print is named Mauverina (the link is for another color variation).

The pattern I used for this shirt, B5526, is the one my friend Susan altered for me. I've sewn it twice since. The first time it was my No. 1 Ladies Detective Agency shirt. This time I altered it by adding tucks in the front and fish eye darts on either side in the back. I also used the pocket in the pattern but made a little kind of heart shaped tuck in the front I'm really happy with.

I interfaced the pocket, color, cuffs and hem with silk organza, that's a new thing for me to try.

I'm really happy with the way I grouped the buttons in groups of threes (except the top button stands alone, and it can also be left unbuttoned) - one every inch apart and then a space of 3 inches between each grouping.

I'm also happy that this long shirt is flattering over the jeans I made in the fall.

Knowing this is a piece I'll be reaching for again and again in my closet, keeps me....
Enchanted by Sewing

~ ~ ~
Resources

I like to pin swatches of Liberty's Tana Lawns 
http://www.pinterest.com/lrshimer/gorgeous-fabric-liberty-of-london/

Saturday, December 28, 2013

Ench By Sew-15 Festive Time Fabric Quiz - Made for California (Winter Holiday)

Our Best Holiday Edition Ever!
The Enchanted by Sewing
Made For California
Festive Time
Fabric  Quiz
In California Toyon Berries are Natures Gift for the Winter Holidays

Hey! 
The latest Enchanted by Sewing Podcast has been published!
Two Ways to Listen
Option I)You can listen to the show right on the web by clicking on the this link
~ OR ~
Option ii)  Click on this link to iTunes  to download this and other Enchanted by Sewing shows to your mobile device (iPhone, Android, etc.) free from iTunes
Did I miss any links mentioned in the show? If so, please post here and let me know, or else email me EnchantedBySewing AT gmail DOT com
~ ~ ~
This month I’m taking a leaf out of the book of some of the podcasts and columnists I enjoy, who run a themed quiz during the winter holidays. I’ve always enjoyed taking these kinds of mini tests,  and feeling like a smarty pants when I’m  able to answer their questions. I also get a kick out of trying to wow my family with my knowledge of trivia on various subjects. They are rarely impressed.

My own, Enchanted by Sewing holiday quiz is focused around four fabrics that work well for sewing, wearing and enjoying here in California’s temperate San Francisco Bay Area. So pull up a few bolts of your favorite stuff, plop down on top, and let’s get started .And don’t forget to keep score!

During the audio quiz... you will be ranking four fabrics in terms of their strength. At that time, I sing you a little fabric themed tune. Since cotton is one of the fabrics in the quiz, I thought you might enjoy my updated version of the old "Boll Weevil" song, Here are my adapted lyrics.

The Boll Weevil is a little black bug
Come from down south they say
Come all the way to California
Just a lookin' for a place to stay.

Chorus
Just a lookin for a home.
Gonna get herself a home.

The Farmer said to the Boll Weevil
I see you on the Square.
Yes, 'mam, said the Boll Weevil
My whole gol durn family's there.

Boll Weevil said to the Doctor,
Better put away your pills,
When I git through with the Farmer,
She Cain't pay no Doctor bills!

Boll Weevil said to the Business 'Mam,
Sister, drink your lemonade.
When I git through with you, Gal,
Gonna drag you outta that shade!

Boll Weevil in yo field, gal,
It's just like shooting dice,
Work the whole gol  durn year around,
But the cotton won't bring no price

The Boll Weevil knocked on my front door,
She said I've come to eat,
I'm gonna starve you plum to death
And get the shoes right off your feet.

Ranking your fabric savy

There are 12 points possible on this important examination.

If you get:

0 - Fabri-Wanna-Be Hey, you tried hard! Go back and try again. (And that rayon date is pretty easy, so I say do that one first)
1-4 – Junior Fabric Fairy- I’m proud of you! You have definite potential. Next time through, you’ll be flying high onto the top of the fabric inventory pile.
5-8 – Fabraholic - Hey, good job! You are on the path to material excellence.
9-11 Fabric Wizard – You really know your stuff when it comes to the goods!
12 – Fabric Royalty – You are a genuine know-it-all, the queen (or king) bee of the fabric pile.

 * * *
When it comes to garment creation, Clare Shaeffer (in her Fabric Sewing Guide says of linen “Select patterns with tucks, gathers, pleats and gores” No kidding.

When it came to draping Lucy, those basic tucks that had created simple bodice lines in the muslin test garment, turned into lovely graceful swirls when I cut out the pattern in the natural linen fabric, and hung it on my dress form. Suddenly folds that hadn’t been there before sprang to life and Lucy was born!


Learning more about, and sharing knowledge of, the fabrics I love to sew, are the kind of thing that keep me…
Enchanted by Sewing.
~ ~ ~
Resources


Me Encanta Coser/Enchanted by Sewing is My Regular Sewing Blog.  Recent Postings Included: Draping HollyDraping Lucy, Christmas Tutu 1 (I did a few Christmas themed ballerina ideas in December). 


Thai Silks/Exotic Silks Buy in store or online


* I have a number of sewing related boards on pinterest. I pinned links to several sites I referred to when preparing this 'cast to my Gorgeous Fabrics pinterest board.


Friday, December 20, 2013

Draping Lucy - Terminado! New Dress and back to Rec Sewing


Lucy is the first garment I've
created  from a pattern I
made entirely myself, on my
custom dress form.

I haven't done any regular, recreational sewing all semester (one semester = 16 weeks) because I've been focused on the class work and final projects for my two fashion classes at CaƱada College. The first class was Pants Drafting, taught by Lynda Maynard (that's the woman who knows what we really want to sew, and teaches us how to do it!)  In that class, I used drafting techniques,  and many fitting followups, to produce inumerable muslin garments, tissue pattern drafts, and my first pair of jeans. Can't wait to use that pattern again and again!

My second class was Draping. This class is excellently taught by Judy Jackson. Again I went through a lot of muslin, this time learning to design my own patterns by draping them in muslin fabric on a dress form, then creating tissue patterns from those draped garments. You may have seen some of my posts this fall that showed off some of the basic garment shapes I created on a standard sized 10 dress form (I called her Babs, a name that seemed appropriate for a mannequin who came to life in the early '60's). I also began draping on my own custom dress form that I created over the summer. 

When I last talked about my custom dress form I was calling her Colette, but I've since realized that she is really a Conchita
I found working with Conchita even more challenging than working with Babs, and Babs wasn't an easy customer. Was it because Conchita represented clothing I actually plan to wear? I'm not sure yet. But if I figure it out, I'll let you know!

Starting around midterm time, I spent several weeks creating a muslin sloper (a fitted bodice and fitted straight skirt) for Conchita. For some reason I found this very challenging, though I had produced the same garments for Babs. My teacher seemed to think that there should be the same amount of challenge, if only I was careful with my measuring. I worked very hard to be exact but all I can say is that it was much harder for me and just took a lot of time, muslin, tissue and patience.

Another view of Lucy
As you can see, I moved on from my sloper to make my first garment. I had originally planned to make a traditional shoulder-yoked, dropped shoulder, shirtwaist dress with a collar and front button plackets. I was of two minds as to whether the dress would have a separate skirt joined by a waistline seam or be a one piece dress. I was planning to use a beautiful piece of deep forest green silk noil (raw silk) that I have for that dress. In my mind the dress I was planning to drape was named Ivy. I'm still planning to take up with Ivy in the not to distant future. But I got distracted by Lucy....

I'll be writing more about the process of draping Lucy in upcoming postings in this journal. One thing I know I'll be reflecting on repeatedly, is learning to read the fashion fabric's story. This lesson came from my experiences in both my pattern-creation classes this semester. In both cases I saw that constructing beautiful garments is not just about designing a piece in my mind or on a sketch pad. It really comes down to watching the behavior of the fabric I've chosen to sew with, after it's cut out and initially put together on me or my custom dress form. Creating a muslin test garment is an important part of the pattern making process, but once I start the ball rolling with muslin, I then really have to listen to the story the actual material for that garment is telling me. That's what is going to guide me to bring the garment I'm sewing to life.

Learning to listen to, and read the fabric's story really keeps me
Enchanted by Sewing
~ ~ ~ 

Resources

You can drape on a person or on a dress form. When creating for ourselves, it's easiest to use the dress form approach!

In the September Enchanted by Sewing Audio Podcast Dress Forms Episode, I described my experiences creating two different dress forms. You can listen to this talk either online on the web, or you can download the show to your mobile device (like an iPhone, Android, etc.)
http://www.enchantedbysewing.blogspot.com/2013/09/ench-by-sew-12-dress-forms.html

I'm just beginning to learn the historic and modern art of draping. It's a very artistic experience !  I've begun to develop my skill set in a class taught through the CaƱada College Fashion Department. I'll be continuing my draping journey by continuing to follow the richly illustrated draping tutorials and examples in our class textbook, The Art of Fashion Draping. This excellent, and highly regarded book, by Connie Amaden-Crawford has been in use for decades. both within the industry, and by home sewists. 

Thanks Sponsors! 
When you buy products through links in this blog, you support the regular work of this blog and The Enchanted by Sewing Podcast.

California Tree Spirits (haiku)

Click on the illustration above
to fully enjoy the details of our CA dusk
Tree spirits thrive 'round here.
They chat 'neath westering sun.
California!

Followers