Art Journal

Nature Ramblings ~ Past Times Time Travel ~ Romancing Daily Life
Showing posts with label pattern. Show all posts

Saturday, January 16, 2016

I gotta remember to Stay-Stitch those sleeves! Muslin: M6076 - Princess Seamed Shirt - Pattern Work


I cut out the muslin for this princess-seamed shirt a while back. It's the same pattern, M6076, I first started using to create my sleeveless Western Winds shirt back in the early fall. Now I'm continuing to create a sleeved version. This pattern has multiple princess-seamed options (a princess-seam can end up in different spots on the garment) and lots and lots of instruction sheet ideas for getting a good fit. A really good basic pattern.

I'm not instruction sheet oriented - so I have a tendency to forget about stay-stiching! And then I wonder why the sleeve stretches out of shape when I go to set it in! Same deal with other curved seam areas. And it's particularly important when I'm creating a muslin/toile - because this is the time for getting the seams to come together right .

Set in Sleeve test - the outer line is stay-stitching (regular stitch line).
The inner line is a basting stitch for easing or setting the sleeve cap into the
armscye (the curved opening in the bodice)
I added two tucks in the front of the sleeve cap, because after I measured the alterations to the bodice (the armscye line), 
I found that there was too much sleeve cap. I want only about 3/4" more in the sleeve cap, than in the armscye. Also I took note
as to the center of the sleeve - so I only altered the front, the back looks like it has about the right amount of extra.

I must admit, this is not exciting sewing. In the past I always just went ahead and sewed up a pattern and hoped for the best. But I've learned the value of a well fitting pattern. It means I'll get this one pattern working for me - and then I can just zip through future versions, knowing they'll look and fit great and I'll reach into the armoire for them again and again.

I added a one inch seam allowance for fitting a muslin/toile.
Learned this from Lynda Maynard.
I used a double Clover tracing wheel for this - it has two heads.


Sunday, November 15, 2015

Sleeveless to Sleeved - Pattern Work - M6076

The purple line shows the cutting lines I used for altering the original pattern to be  sleeveless
The red lines are my new adjustment lines
Earlier this fall, I first began working with the princess-seamed pattern M6076. The first result was my sleeveless Western Winds Shirt. I really liked the fit, fabric and buttons on this shirt and I wore it quite a lot.  The pattern doesn't actually come in a sleeveless version - I raised the underarm point and then graded the top of the underarm seam to create a well fitting sleeveless version.

My next goal is to create a sleeved version. So far (Jasper is encouraging slow sewing!)  To date, I've just worked on one of the four pattern pieces - the Side Front. 

Once I get all four pattern pieces reworked, and since I made alterations right on Western Winds, I'll probably make another sleeveless version just to test this version of the pattern. Also I have enough clover green linen left from my Irish Laurel dress to make it!

Then I'll be testing the sleeved version in muslin. The main changes I'm making are
1) Taking the end-of-shoulder point back out about 1"
2) Taking the underarm point out 1"
3) Dropping the underarm seam point 1.5"

I went back to Western Winds and noted where I actually sewed my princess-seams
Then I added a new seam allowance, using a Clover tracing wheel
, 1" out from those seams. 


Monday, October 12, 2015

Western Winds Princess-Seamed Sleeveless Shirt- Terminado/Finished!

I talked about the process of altering the princess-seamed shirt, commercial pattern M6076, back in Fitting Western Winds . I used my sloper to work in conjunction with the pattern.

Fitting + sewing made it such that I put off finishing the project. It means the project took a little longer. And yah know how 'tis.... when I don't sew every single day a project looses it's oomph. I wanted to get going with something else new when I had time to sew.


Good thing I had a trip to visit with my dear cousin in San Diego  motivating me to finish my Western Winds shirt. I loved wearing it on the trip, and have worn it several times since. It's still summer-warm in my part of California. Aren't I glad this good warm weather basic didn't become a UFO, because it's been adding a lot to my just-doesn't-feel-like-fall-yet wardrobe.

BTW I simply used bias tape to finish off the inside of the armscyePor que no? It works great and I had it already.

Fabric was from the "Japanese Cottons" section at Stone Mountain and Daughters in Berkley (in my materials inventory for about a year and a half) 


Horsey buttons were in my buttons inventory - scored them free somewhere. They give it that true western feel, don't you think?


Western Winds - Terminado/Finished!

I talked about the process of altering the princess-seamed shirt, commercial pattern M6076, back in Fitting Western Winds . I used my sloper to work in conjunction with the pattern.

Fitting + sewing made it such that I put off finishing the project. It means the project took a little longer. And yah know how 'tis.... when I don't sew every single day a project looses it's oomph. I wanted to get going with something else new when I had time to sew.


Good thing I had a trip to visit with my dear cousin in San Diego  motivating me to finish my Western Winds shirt. I loved wearing it on the trip, and have worn it several times since. It's still summer-warm in my part of California. Aren't I glad this good warm weather basic didn't become a UFO, because it's been adding a lot to my just-doesn't-feel-like-fall-yet wardrobe.

BTW I simply used bias tape to finish off the inside of the armscyePor que no? It works great and I had it already.

Fabric was from the "Japanese Cottons" section at Stone Mountain and Daughters in Berkley (in my materials inventory for about a year and a half) 


Horsey buttons were in my buttons inventory - scored them free somewhere. They give it that true western feel, don't you think?


Sunday, May 24, 2015

Ench By Sew-32: Parlez Vous French Pattern Drafting?

The May Enchanted By Sewing, Episode 32 Audio Show is Up ! 

Listening Option 1: Download from iTunes
Click on this link to iTunes  to download this and other Enchanted by Sewing shows to your mobile device (iPhone, Android, etc.) free from iTunes

Listening Option 2: Direct Download/Listen on the Web

I first signed up for Lynda Maynards' French Pattern Drafting Class to help me improve my fit and alteration of commercial patterns and was surprised to find that Lynda's class opened my eyes to the idea of drafting my own patterns - an aspect of sewing I’d never expected I’d get involved with, and frankly considered beyond my skills.

Studying with a teacher like Lynda and being inspired to try new things – that’s the kind of thing that keeps me, enchanted by sewing!

1) Pensamientos Primeros – The Art of French Pattern Drafting


My Pattern Work Postings

Early Days in Pattern Drafting Class - Includes Kenneth King Link http://meencantacoser.blogspot.com/2015/02/drafting-my-back-block-learning-pattern.html

More from Class http://meencantacoser.blogspot.com/2015/02/french-pattern-draftingmoulage-first.html 
and

http://meencantacoser.blogspot.com/2015/03/fitting-in-sleeve-sloper-pattern-work.html
 Using My Sloper and Moulage to Draft Patterns
http://meencantacoser.blogspot.com/2015/04/pattern-workparlez-vous-tee-shirt.html

http://meencantacoser.blogspot.com/2015/04/damson-plumm-private-eye-nibbled-that.html
     Parlez Vous Flared Skirt? http://meencantacoser.blogspot.com/2015/04/pattern-work-parlez-vous-flared-skirt.html
 

Pattern Work on Pinterest:Links to many pattern drafting and design resources  https://www.pinterest.com/lrshimer/0-sewing-pattern-work/

2) Technicos  - On Wearing Ease Going from a Moulage to a Sloper and Back Again
http://meencantacoser.blogspot.com/2015/05/parlez-vous-wearing-ease-moulage-to.html

3) Pensamientos Finales – My sloper...A garment for any occasion?
 

Sunday, April 12, 2015

Damson Plumm Private Eye - Nibbled That Tee


Damson Plumm Private Eye is, as you might imagine, inspired by bounty hunter Stephanie Plum
Remember when I blogged about Lynda Maynard's French Pattern Drafting class starting to pay off? Yes, I am indeed mighty happy with this plum purple tee shirt I created from a pattern I drafted myself. It was based on nibbling away at  the moulage fitting pattern that came out of Lynda's class. I also really like the royal plum-purple rib knit that I used to make the tee. Can you believe I found this material in my fabric inventory? ( Fabric inventory sounds so much better than fabric stash.)

What did I learn while creating this tee? 1) Don't fit the front and back first and then add the sleeve. I thought this top fit so perfectly, after mocking up just the front and back, that I sewed over the basting stitches in the side seams and then went on to
a) Redraft the sleeve pattern- making it much narrower
b) Cut out the reduced size sleeve
c) Sew those nice narrow sleeves in.

Uh oh....Taking in those side seams would have been fine, if I'd wanted a sleeveless tee, but I didn't.

Hardy har har - you should have seen my arms looking like sausages, unable to move. And we all know how fun it is to pick stitches out of knit fabric!
2) So, good thing, I had already learned to  ... cut super wide seam allowances when I'm playing with new patterns I draft myself. Thank goodness I had made my seam allowances 1 and 1/4 inches wide. I wouldn't have had enough fabric to rework the underarm seams on my sleeves otherwise- because of course I'd redrafted the sleeve to be so much narrower, after I'd fitted the front and back together, taking in the side seam allowances by quite a lot (smaller than the original moulage indicated).
3) Even though I wasn't in the mood, I measured all the changes I made on this tee and prepped a complete new pattern, all ready to try out on another tee project. Because another thing I've learned is that I don't always remember what changes I made, and I can't always find the last garment I made from a pattern when I go to use it.

  ~ ~ ~
Damson Plum is, as you might imagine, inspired by bounty hunter Stephanie Plum. Stephanie is younger than me, even funnier than me and has a grandmother who drives a hard-working gal crazy, but I still identify with her.

Damson Plumm Private Eye is inspired by bounty hunter Stephanie Plum.
Way back when, I created a Damson Plumm Private Eye label for my home made plum jam (using my home grown damson plums). And now, thanks to my new pattern drafting skills, I've drafted the pattern for, and sewn, my own Damson Plum Private Eye tee shirt. I'm sure it's the plum-purple that Damson always wears, that helps her crack those tough cases.


Friday, February 20, 2015

French Pattern Drafting/Moulage: First Muslin Test of Back and Front Blocks

I detailed what I'm learning about  in my Moulage/French Pattern Drafting class with Lynda, in this post http://meencantacoser.blogspot.com/2015/02/drafting-my-back-block-learning-pattern.html
I added a sort of modesty skirt below the full hip line
Other ladies wore leggings or just winged it in their
intimate garments

This week....I zipped myself carefully into the muslin test I created from my back and front blocks, for Moulage class. Uh oh, I sewed the zipper inside out! I thought Lynda Maynard wanted our seams and darts on the outside.
Guess who wasn't listening properly in class last time?

A buddy in class managed to get the zipper tab up for me.
Not too many changes, but I still need to make those few, and make a new muslin for next week. I'm in good company though. I think there were only one or two people who didn't need Lynda to tweak theirs.

How about those lips?
I had the goofiest look on my face
I kind of like these lips I borrowed!

Saturday, January 24, 2015

Tapestry Purses/Totes/Bags - Sewing Day with Susan


My buddy Susan, made a number of really beautiful purses and totes from tapestry prints with McCalls M5822. The pattern envelope doesn't show what great creations are possible with this pattern, or else Susan is simply a better designer than whomever created their display pieces.

In this month's Enchanted by Sewing Audio Podcast show, I'm interviewing Susan and we talk about her experiences making these gorgeous purses. You can sign up to get an email when that (and other) monthly episodes are published. I publish the shows shortly before the end of each month.

I like the way Susan altered the print so she uses both directions on this purse!

Oh lucky sisters and sister-in-law who got these purses for Christmas!

In Progress: This is my favorite purse
~ ~ ~
Web Resources
 Listen in on my Sewing Life in the Enchanted by Sewing Podcast http://www.enchantedbysewing.blogspot.com

Sunday, January 18, 2015

Downton Abbey Cloche Hat Works Today - Starting to Make My Own (Hats, Millinery)

Do you remember when Lady Sybil wore this cloche? It was in the episode when Branson drove
her to a political meeting she wasn't supposed to attend. So it wasn't a super dressy occasion.
I want to create a head fitting pattern out of multiple 
pie-shaped wedges like this. 
I'd also like it to have a nice rolled brim
that displays some kind of lovely lining.
I'm thinking about trying for something like this in lightweight denim.
Sybil's hat appears to have some kind of ribbon around the crown as well.
I'm enchanted by the cloche hats on Downton Abbey. A lot of them would be very wearable for modern times, especially for folks like me who live in a mild-winter California climate and walk a lot. We need to protect our skin (in addition to our SPF 50!) and keep the sunlight out of our eyes. So far I've mostly created fabric caps for this purpose. I like those, but I'd also like something with a brim that goes around the entire hat, not just a bill in the front. 


I use an inexpensive foam wig stand for
storing this straw hat I produced from the first millinery class I took (Wayne* blocked the straws for us, we trimmed them).
See the tissue sticking out underneath?
I need that because my head is 2 inches bigger than
the crown of the stand. My hat is 3 inches bigger than the
stand (for comfort)
It's important to store hats on something that holds the material of the hat in place,
because otherwise eventually, they will collapse.
The wig stand is only 21" around the crown
The crown of my head is 23" - and that's a very tight fit
When I make a hat, it's 24 or 24 1/2 inches, for a comfortable fit.
I want to create a pattern for a cloche hat.
This one measures about 24" around, after I strapped a number of layers of duct tape tightly over my head.
My cloche will have some kind of a brim to keep the sun out of my eyes,
but the first thing is to get a well-fitted shape around my skull
I made this one out of duct tape and a nylon stocking (the knee high kind)
The stocking (more or less!) kept the duct tape from sticking to my hair
I got my ideas for this form from this post on Crafster


After I peeled the duct tape form off my head (pulling out a few stray hairs along the way!) and trimmed the knee high stocking, the rest of the stocking started to peel away, so I applied leftover (tee shirt) cotton knit scraps on the inside. Then I reinforced the edge all the way around with more duct tape. It was actually helpful, making the head/hat block more stable.
The cloche form needs to be stuffed with something to fit well on the foam head block
I could use leftover cotton knit scraps

 (I left the scraps sticking out in this photo just to make the point)
Or I could stuff it with tissue scraps
 (again, I'd actually stuff the tissue all up inside)
At this point, I can start creating a pattern that fits my head, with or without a brim.


~ ~ ~
Web Resources
My tapestry cap inspired an Enchanted by Sewing show. In August of 2014 I recorded an entire audio podcast about sewing fabric caps, including technique and pattern talk http://www.enchantedbysewing.blogspot.com/2014/08/ench-by-sew-023-capping-off-summer.html

*In this posting I talked about my experiences in Wayne Wichern's millinery class. We focused most of our time on a fabric-covered buckram hat. http://meencantacoser.blogspot.com/2013/09/matters-millinery-making-my-own-hats.html,  Early this year, I'll be taking a three full day hat making workshop from Wayne in his studio in Burlingame. I expect to block my own straw and felt hats there. 

My first fabric cap in 2013, was a lovely subtle denim print. I've just about worn this out! http://meencantacoser.blogspot.com/2012/06/caps-off-chewing-bun-with-tuppence.html

Alvan's Crafster post about making a duct tape cloche hat form helped me with my form. Thanks! http://www.craftster.org/forum/index.php?PHPSESSID=gjkdubsculiivgd9tu5t1g50k3&topic=361109.0

Floracraft makes an Inexpensive form for base of a head block - a foam wig stand http://www.michaels.com/floracraft-wig-head/10315631.html

Tuesday, December 23, 2014

Fitted Red Tee in Time for Christmas, Valentines, and Any Day I want to feel cheerful (Vogue 8323)


I'm loving my "Princess Laurel" tee from Katherine Tilton's, Vogue 8323 so much that right after I made it up in floral velour, I repeated the deal in this Christmas'y/Valentine'ish light weight, red, interlock knit. This Katherine Tilton pattern, Vogue 8323, is a princess-seamed, very fitted, tee shirt.

There's more about my experiences sewing this tee in this month's December audio/podcast, Enchanted by Sewing - Festive Holiday Tees and Tea (#27)

Saturday, December 20, 2014

Terminado! My Princess Laurel Tee

There's more about my experiences sewing this tee in this month's December audio/podcast, Enchanted by Sewing - Festive Holiday Tees and Tea (#27)
Hoping to get another photo where the center of the shirt 
doesn't pull up on me! It isn't really THAT fitted.
I've been wearing this princess seam tee 
quite a lot for a week (layered)
I call this my "Princess Laurel" tee because

1) It's named after myself
2) It has princess seams
3) When I was little, my older sister Trisha kept me entertained with stories about her flights to Treasure Land. Apparently she went there every night after I went to sleep. She had a magic plastic comb with genuine diamels that she used to transport herself! One day she brought me a pair of shoes decorated with sequins, that looked, oddly enough, like my old slippers that had gone missing! In Treasure Land, amazingly, there were two princess that looked exactly like us - Princess Laurel and Princess Trisha!

I was a true believer in Treasure Land, and begged her to take me along one night. She promised she would when I was a little older, but I think the comb was lost when we moved and I never got to go.

This floral velour tee shirt is named in honor of the royal garments that Princess Laurel once wore, 

I really like wearing this Katherine Tilton  Vogue 8323, princess-seamed, very fitted, tee shirt. I made this first version in a floral velour (I think that's what it is - the fabric was a freebie from donations made at school), that I think is probably mostly polyester with some spandex. I've been wearing the shirt over a pale pink turtleneck or a black turtleneck, as it's not very warm. It looks pretty without them though, and I look forward to getting a photo of those.

I embellished the shoulder seams with
pale rose glass beads and twists of fabric

I added some pink glass buttons and twists of fabric on the shoulder seams, for fun embellishments. Isn't it great sewing your own clothes and doing stuff like that? Impromptu embellishments like that are just one of many things that keeps me, enchanted by sewing!

The pattern work was harder than I thought - getting the fit lines to mirror my body. I've found that my dress form Conchita is pretty good for getting basic fit areas, but when it comes to absolutely fitted, nothing beats putting the garment on my own body and checking it out in the bathroom mirror (or with a buddy like the day Susan H came and she marked all over the inside for me). One thing I learned was, not to make the adjustments to the princess seams permanent before I added the sleeves! The sleeves pull the fabric back, over and all which ways. Baste, Baste, Baste!  Oh, I had some fun with Auntie Seamah Rippah and all the seams I thought were ready for regular stitching but really weren't!

I employing my lesson about basting while making another plain red version of this tee, which I look forward to blogging about. It's almost done. Of course being a different piece of knit - a kind of fluid interlock, the red knit had to be taken in a little more. And of course the self-fabric neckband had/has to be fit differently.

Getting the neckband on this floral version in right such that it didn't gap and wasn't too tight was a real challenge. I basted a lot with pins and by hand. I also laid it over my duct tape dummy (remember Helen?) to get a sense of how the neckline would fall on my actual body. Boy, no neckband is the same.

Also I think since this neckline mostly curves at the center, then shoots up almost straight, I think the trick is a slight stretch on the curvy center part, then less stretch as it goes up. 
Great tee. I have fabric for a few others that I hope to make soon, while the alterations and fit challenges are fresh in mind. Also I just love the way it looks on, so I want more!


~ ~ ~
Web Resources
My Early Pattern Work on V8323 http://meencantacoser.blogspot.com/2014/10/princess-seamed-tee-shirt-pattern-work.html

http://www.katherinetilton.com

Monday, December 8, 2014

Spinning Straw Into Gold - My Rumpelstiltskin Cowl Neck Knit Top (McCalls 6078)


My  Rumpelstiltskin Straw-Into-Gold Top looks best tucked in!

Oh I love wearing this straw-into-gold wool jersey top! Yes, you're right. The longer hem that worked for my polka dot cowl, is too long for this fluid wool jersey. I may hem it shorter, but I've ended up tucking it in most of the time anyway. What a difference the hand of a fabric makes, eh?

Do you recall a few weeks back, when I finished my reworked Retro Polka Dot cowl-neck knit top? I'm just starting to buildup my pattern wardrobe of tried-and-true patterns, and I love having a pattern I can turn to late one night, and finish off before breakfast.

I pulled out my version of M6078 (the version I traced, altered and know fits me) and a light weight, gauzy , golden wool jersey knit from my fabric inventory one night last week, and the next day I had a great new top to wear. I didn't stay up late making it either:-)

I can spin straw into gold.  I know just how that German gal  in the Rumpelstiltskin fairy tale felt. You remember her? She was the one-time commoner who found a husband by practicing her domestic skills with her spindle and a hunk of straw.*   

This is already proving to be a great top for our not too cold, California cool season. It's good under a long sleeved top, or on it's own. I can wear it with jeans, a denim skirt or my brown stretch-velvet jeans. And yes, I'm tucking it in :-)

I'm so ready to make more. Sewing tried-and-true is the kind of thing that keeps me . . . 

Enchanted by Sewing!


* Honey, I highly recommend a degree in Computer Science as a better option.

Web Resources
My Retro Polka Dot Knit Top  (also blogged about as "Why I don't love Lucy") http://meencantacoser.blogspot.com/2014/11/terminado-retro-polka-cowl-neck-knit.html
Who's Rumpelstiltskin? http://en.wikipedia.org/wiki/Rumpelstiltskin

Saturday, November 15, 2014

Pattern Work: Binder Clips and Household Hooks Keeps Pattern and Fabric Sections Current in a Small Space (Organizing )

Three clips in action!
A little binder clip is hooked over the neck of the hanger.
A bigger binder clip is attached to the top of the hanger.
Farther down one of the hanger hooks supports a few more pattern pieces.
I take advantage of the up and down bits of the clips as well, to keep things out of the way.
Since I've begun working with patterns I'm creating from scratch or altering, I'm finding that I need to keep my pattern pieces handier during the project. That's because I make more changes as the work progresses. 

Locating and re-ironing a particular piece really adds a lot of time. It also just kind of makes me feel nervous not to have my pattern pieces handy, when I have so many personal decisions invested in them!

The most important things are:

1) Don't lose any pieces! I've invested a lot of myself and my time in them.

2) Have all the actual garment pieces, as well as pattern pieces ready and pressed 

I've seen photos of sewist's and designer's studios with their big tissue pieces hanging from specially designed walls and display areas. That's really neat! But, I don't have that kind of space. I've mentioned before that I have a sewing zone, not a whole room. That means I'm sharing my sewing space with my family.  It means I clear off the communal work table, and put most of my bits and pieces away, every time I stop a particular work session. Honestly, I'd rather have the company than the space!
A skirt hanger holds up a number of current pattern pieces. More pieces dangle from another binder clip I slipped over a nail in the corner (off to the left). These areas are, more or less, out of the way from other folks who use the family room where I sew.
My pattern pieces and cut out garment sections are another thing however. I need to be sure I have all those individual pieces - both cut out fabric sections and individual pattern pieces I need to refer back to - close at hand and ready to use. I also need them to stay as pressed as possible in between work sessions. I bet you know the challenge of having maybe only a half an hour to sew. It can take that long to re-press a cut out section or pattern piece.

What works for keeping my pattern pieces at the ready and out of the rest of my families' way? 

Binder clips (two sizes), skirt hangers with clips, and every out of the way hook (or nail) I can find, does the job for me. I also have one of those long 'S' hooks (designed for plant pots) that I can slip into loops like the curly brackets that support our high shelves. Once I have hooks in place, I have something to slip my clips and hangers over. There are my pattern pieces all ready to go - snugged in a clip - with the cut out fabric attached, or just on their own waiting to be called into use, or  ready for a penciled note. 

I can hang up layers of pattern pieces within one binder clip and laying over another. I can dangle all those clips from a hook, nail or the neck of a hanger. Several items (both paper and cut out pressed-and-ready-to-go fabric) can be clipped together. 

This method of keeping all my pieces hanging at the ready has really helped me during my current work on my shirt dress Ivy. That silk noil fabric wrinkles like crazy, and I've saved a lot of ironing time.

Once the project is over, I'll make sure I've got all my notes on the pieces, then fold and press them, and store them away in my "Tried and True" pattern box. But for the time being, my clip and hook organization method keeps what I need handy, while making sure nothing gets in anybody else's way.

Figuring out how to keep my pattern and garment sections pressed and at the ready, helps make my sewing time more enjoyable, because it keeps my project steaming along.


That's the kind of thing that keeps me . . . 
Enchanted by Sewing!

~ ~ ~
Web Resources

Sunday, November 2, 2014

Terminado! Retro Polka Cowl Neck Knit Top (M6078)

Hey! I got that remake of my retro-style polka dot knit top finished!
It's McCalls M6078.
I blogged about my experiences altering this pattern, and sharing my attitudes towards I Love Lucy:-) in  Reworking a Retro Style Polka Dot Tee

I've been focusing more on wardrobing in my sewing. (How about those red accents!) I talk about wardrobing and my pattern alteration experiences, in the October episode of my Enchanted by Sewing Audio Podcast

Thursday, October 30, 2014

Ench By Sew-025: Restyling


Hey! 
The latest Enchanted by Sewing Podcast has been published!
Listening Option I) You can listen to the show right on the web by clicking on this link
~ OR ~
Listening Option II)  Click on this link to iTunes  to download this and other Enchanted by Sewing shows to your mobile device (iPhone, Android, etc.) free from iTunes 
https://itunes.apple.com/us/podcast/enchanted-by-sewing/id566370325)

This month’s show  is  Restylin’.
It all came about when I started shaking the dreams from my hair. Restylin' is about my transition in sewing and wardrobe style . It involves looking at patterns in a new-to-me way, and working my brain around ways I want clothes to fit me.

The Enchanted by Sewing Podcast is, an extension of my regular sewing blog - Me Encanta Coser, which,  roughly translated means, Enchanted By Sewing 

My blog is written in English. The name celebrates the historical and modern use of the beautiful Spanish Language in the San Francisco Bay Area of California, where I live. 

This month I’m working on creating two tee shirts M6078 and V8323. The details are in these blog postings from MeEncantaCoser.blogspot.com
V8323 - Princess Seamed - Katherine Tilton Tee http://meencantacoser.blogspot.com/2014/10/princess-seamed-tee-shirt-pattern-work.html

M6078 - Retro Style Polka Dot Cowl Neck Knit top - Reminiscent of I Love Lucy http://meencantacoser.blogspot.com/2014/10/reworking-retro-style-polka-dot-tee.html

1) Pensamientos Primeros
– (Sewing) For my wardrobe’s sake (How about those red accents!)
2) Technicos  
Reworking my sewing style/methods. Pattern alteration experiences.
3) Pensamientos Finales
Transitions - Restyling  

David Crosby sang, 
“I almost cut my hair
It happened just the other day . . .”

4) Epiologue 
Redefining what I want to create

Vogue - Sofía Vergara http://www.vogue.com/865250/sofia-vergara-dangerous-curves/

* * *
Restyling has me  shaking the dreams from my hair.   That’s just one more thing that keeps me . . . 
Enchanted by Sewing.


Monday, September 29, 2014

Ench By Sew-024: Shirtdressing and Fall Fun

Hey! 
The latest Enchanted by Sewing Podcast has been published!
Listening Option I) You can listen to the show right on the web by clicking on this link
~ OR ~
Listening Option II)  Click on this link to iTunes  to download this and other Enchanted by Sewing shows to your mobile device (iPhone, Android, etc.) free from iTunes 
https://itunes.apple.com/us/podcast/enchanted-by-sewing/id566370325)
Please note that the Fantasy Fall Sewing Questionnaire from the show, is at the end. Please post any and all answers below, or email your thoughts to EnchantedBySewing@gmail.com

I've recently started a Shirtdress Sewing Board on Pinterest :-) http://www.pinterest.com/lrshimer/shirtdressing-sewing/


Here are the two dresses I created in September, and talked about in the show
Hey I just realized I'm holding the tapestry cap I focused on
in last month's podcast!

This is the happiest I've ever been with the job I did on a sewing project
:-)
Check out the beautiful Fran Leibowitz photo of Amy Adams that inspired me to finally get cracking on my own shirtdress http://meencantacoser.blogspot.com/2014/08/inspired-by-amy-adams-creating-perfect.html

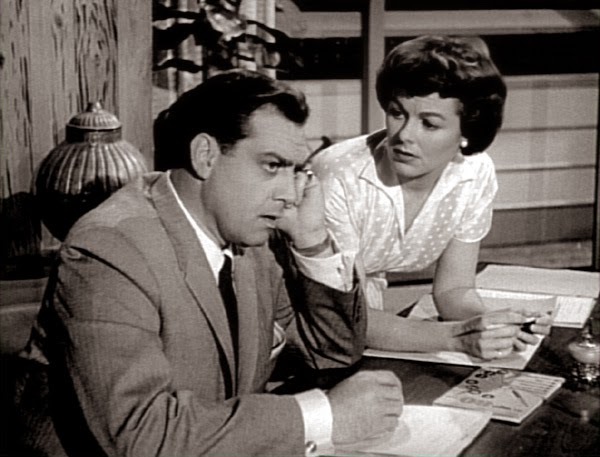
Della Street often advised Perry Mason in his work, by asking leading questions.
She also wore a lot of shirt dresses!

You often see only the bodice of Miss Streets shirt dresses,
But I can see just enough of the skirt fabric here to see that it's the same as the bodice.
I bet the costume designer altered the same pattern repeatedly for the actress :-)
Della Street, Perry Mason's "confidential secretary" often wore shirtdresses. They gave her a professional and ladylike image.

Look to television shows from the late 50's and early 60's for examples of retro shirtwaists that still look up to date. Below is an example in what appears to be white satin (!) alo from Perry Mason. I love those wide, rounded shawl-collar lapels too. Shawl collars were again popular in the 1980's.
One of Perry Mason's clients wears a shirtdress
in white satin
Love that sheen, and such an unexpected fabric choice!

It's a very full skirted shirtdress
And the bodice has a lot of fabric too - very blousey

I love the wide shawl collar too


OK, the pattern I used is not a current pattern (though I found it for sale in a couple of places on the web). It is however a classic shirtwaist style and you can find many similar dress patterns currently in print. I don't think there's every been a big four pattern company season, when there wasn't at least one shirtdress in every catalog.
I made the version shown here in the front row in blue.

I journaled about the shirtwaist (Peaches and Cream) I created, in my blog, Me Encanta Coser, over the course of September and early on 


Fantasy Fall Sewing Questionnaire
Please post any and all answers below :-)

1)  Roughly where do you live in the world – you don’t need to get too specific.  
2)  What’s the climate like where you live in the fall?  
3) Is there a big change between what you wear/sew in fall versus summer?

4) Which is your favorite fall celebration ? Do you have Halloween or Thanksgiving where you live?  
5)  Do you have special or different foods that says fall to you?  

6). What is your favorite fall fabric – whether or not you’d sew it up in your climate/region?  If different What is your favorite fall fabric that DOES work well where you live?  
7) What is your favorite fall color – this year?  
8)    Do you have  a specially favorite fall fabric pattern (like a printed design or a pattern woven into fabric)?  

9)  Do you have a fave classic fall garment you’d like to sew or have sewn? Is it for yourself or for someone else?   
10)    Do you hope to sew one or more practical garments for fall, and if so what?  
11)      If different than the previous garment -  Do you hope to sew one or more special  garments for fall? What?
12)  If you could wave a magic wand, and create anygarment that feels like fall what would it be?  
13)  Would that magic wand garment garment play a regular part in your wardrobe, or would you just like to have it and wear it on special occasion(s)?  

Did I miss any links mentioned in the show? If so, please post those links below and share them with everybody
Email- EnchantedBySewing@gmail.com

~ ~ ~


Followers