Art Journal

Nature Ramblings ~ Past Times Time Travel ~ Romancing Daily Life
Showing posts with label muslin. Show all posts

Saturday, January 16, 2016

I gotta remember to Stay-Stitch those sleeves! Muslin: M6076 - Princess Seamed Shirt - Pattern Work


I cut out the muslin for this princess-seamed shirt a while back. It's the same pattern, M6076, I first started using to create my sleeveless Western Winds shirt back in the early fall. Now I'm continuing to create a sleeved version. This pattern has multiple princess-seamed options (a princess-seam can end up in different spots on the garment) and lots and lots of instruction sheet ideas for getting a good fit. A really good basic pattern.

I'm not instruction sheet oriented - so I have a tendency to forget about stay-stiching! And then I wonder why the sleeve stretches out of shape when I go to set it in! Same deal with other curved seam areas. And it's particularly important when I'm creating a muslin/toile - because this is the time for getting the seams to come together right .

Set in Sleeve test - the outer line is stay-stitching (regular stitch line).
The inner line is a basting stitch for easing or setting the sleeve cap into the
armscye (the curved opening in the bodice)
I added two tucks in the front of the sleeve cap, because after I measured the alterations to the bodice (the armscye line), 
I found that there was too much sleeve cap. I want only about 3/4" more in the sleeve cap, than in the armscye. Also I took note
as to the center of the sleeve - so I only altered the front, the back looks like it has about the right amount of extra.

I must admit, this is not exciting sewing. In the past I always just went ahead and sewed up a pattern and hoped for the best. But I've learned the value of a well fitting pattern. It means I'll get this one pattern working for me - and then I can just zip through future versions, knowing they'll look and fit great and I'll reach into the armoire for them again and again.

I added a one inch seam allowance for fitting a muslin/toile.
Learned this from Lynda Maynard.
I used a double Clover tracing wheel for this - it has two heads.


Sunday, November 29, 2015

Pattern Work - Working For My Plaid - M6076 Princess Seamed - With Sleeves

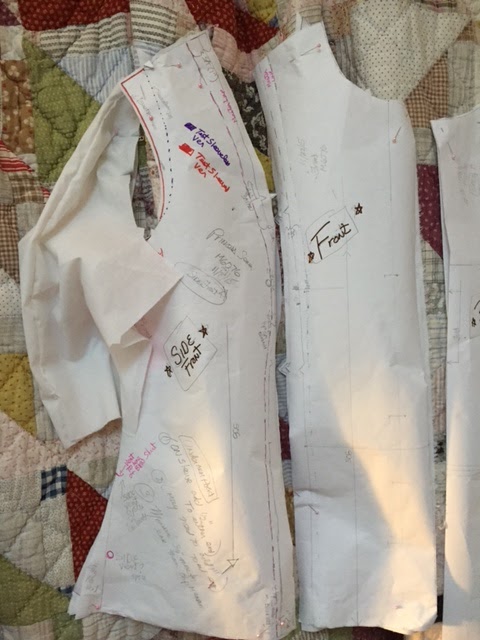
Can't you just envision these pattern pieces and muslins as a red-plaid princess-seamed shirt?
In the November episode of the Enchanted by Sewing audio/pocast, I talked about sewing tartans and plaids. I also mentioned I have plans for a new red plaid, princess-seamed shirt, using M6076. As you may have noticed in my recent postings, Jasper-the-new-pooch has been sewing my slow sewing down even more. Still, I have gotten in some pattern work!


All four pattern pieces have a muslin attached. My next step is to transfer the seam lines onto the muslin, before I begin basting.

 I drew those seam lines  onto the pattern, based on the measurements I took from the sleeveless Western Winds shirt, which I created from this same pattern (altering to create a sleeved version as well as getting a good fit for me). I've really enjoyed wearing Western Winds and got quite a lot of late summer/early fall use out of that shirt - of course here in California it stays warm longer than much of the U.S.

For Western Winds, I cut back the top of the shoulder towards the neck, but I've dropped that back in place for this sleeved version. My new pattern includes lines for both sleeved and sleeveless versions. I  cut with room for either version, then use my clover wheel to lay down the armscye lines, then cut away what I don't need for the particular version I'm making. 

For more description, see my previous post- Sleeved to Sleeveless.

There's a good chance I'll be making a few more changes to the muslin, and therefore pattern, before I snip into that red plaid. I also plan to re-test the new pattern on another sleeveless version, sometime over the next few months. Tried and true patterns take a while to get just so, but they sure are worth their weight in gold.
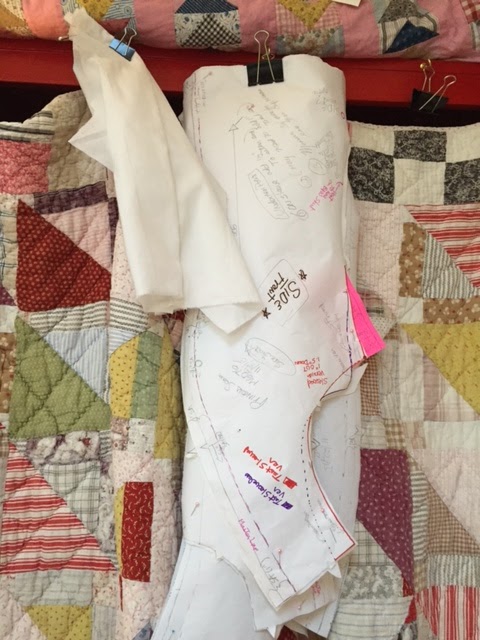
I store in-progress muslins and pattern pieces clipped onto binder clips  hanging off cup hooks. That way they don't get wrinkles in between sewing sessions, and they all stay together.


Friday, February 20, 2015

French Pattern Drafting/Moulage: First Muslin Test of Back and Front Blocks

I detailed what I'm learning about  in my Moulage/French Pattern Drafting class with Lynda, in this post http://meencantacoser.blogspot.com/2015/02/drafting-my-back-block-learning-pattern.html
I added a sort of modesty skirt below the full hip line
Other ladies wore leggings or just winged it in their
intimate garments

This week....I zipped myself carefully into the muslin test I created from my back and front blocks, for Moulage class. Uh oh, I sewed the zipper inside out! I thought Lynda Maynard wanted our seams and darts on the outside.
Guess who wasn't listening properly in class last time?

A buddy in class managed to get the zipper tab up for me.
Not too many changes, but I still need to make those few, and make a new muslin for next week. I'm in good company though. I think there were only one or two people who didn't need Lynda to tweak theirs.

How about those lips?
I had the goofiest look on my face
I kind of like these lips I borrowed!

Sunday, September 22, 2013

Jeans Sewing: Demystifying Jeans Drafting (Fit)

A classmate gave me permission to share
this photo of her first muslin being fitted
Notice that a piece of elastic has been pinned along
the waistline she stitched on her muslin. Part
of our fit job, was to make sure that line ended up
at her natural waistline. Do you see the pins at the
side seams? We added fabric beneath those zones.
We can tell the pants are fitting better in this zone now,
because the red lines of stitching that our classmate
basted at the high and low hip, are now
parallel to the floor.
In a recent posting I wrote about the class I'm taking in pants drafting. There, I'll be creating a pattern for jeans that will flatter my figure. (There are commercial jeans patterns that include extra instructions for fitting jeans patterns. )

The drafting process is pretty much new to me. I'd drafted two simple garments from books, but nothing anything along the lines of a pair of pants. Here's what I've learned so far.

First we created a pants block, taking personal measurements and making calculations as directed in the class textbook (*). Both the front and back block are contained within the same drawing, there are just different lines to follow. I found that somewhat heavy banner paper from an office supply store worked best for this. This block pattern does not include seam allowances.

Second I traced the pants block and created two tissue pattern pieces. Now I had separate front and back pieces. Before I cut out the pattern pieces I added 1 inch seam allowances. I measured out from my stitching/fit lines on the block with a clear ruler to add the straight seam allowances, and drew dotted lines where there were curves. I tried a Clover duel-wheel tool to do this - it looks like one of those carbon paper type wheels you might typically transfer pattern markings with - but I couldn't manage to get it to make two dark enough lines.

Third I pinned and cut out muslin pieces. I used a regular single tracing wheel and brightly colored tracing paper to mark every single measurement we'd used to create or draw on the block. These included: straight of grain, waist, high hip, low hip, crotch, thigh and calf. I also marked darts, the side seam, and bottom stitching lines. I used a 200 thread count muslin, which seems to be somewhat tighter than a typical muslin, it cost more too. I read somewhere that you cannot assume that higher thread count means it's better. You have to develop a feel for the good stuff.

I basted every single one of the stitching lines I'd marked with a stitch length of 5. I did use a locking stitch at the beginning and end of my stitching. I staystitched the waist line and bottom of the pants with a stitch length of 2.5. The staystitching keeps the muslin from stretching too much during fitting.

Fourth I sewed the muslin test garment, one leg at a time, then the crotch seam (putting one leg inside the other) for a smooth crotch seam. I left the center front seam open to the bottom of where the fly front zipper would be sewn - so I could put the test garment on !

Fifth I took my muslin test garment to class and worked with my fitting group to begin fitting the garment. This is the point where you look for all the things you often see in books about fit, things like folds in the wrong places, smiles and wrinkles. 

The most important thing I learned at this stage, was to keep the lines basted on the garment either parallel or perpendicular to the floor. Often the signal for a fit problem was that a fit line veered away from the straight.

• Where garments were too tight, we snipped along different basted lines and inserted pieces of fabric. You can see some of that in the illustration above.  
 Where garments were too loose we made tucks and folds.
• We adjusted the rise of some parts of our garment. Typical of this type of adjustment was snipping along the high hip mark, moving the waistline up, and pinning a piece of muslin underneath. Often these adjustments were curved.

Sixth Next, I'll be altering my tissue pieces to create a second pattern draft using the alterations on my muslin test garment, then it will be time to create a second muslin test garment.

Yes, it's a time consuming task. And it's exciting to learn more about how to create garments that truly fit.


Learning about pants drafting definitely helps keep me
Enchanted by Sewing!
~ ~ ~ 
We're using the book Building Patterns, The Architecture of Women's Clothing by Suzy Furrer.

Followers