Art Journal

Nature Ramblings ~ Past Times Time Travel ~ Romancing Daily Life

Thursday, October 3, 2013

To Drape or Not to Drape - No Question About It - Ericson Is Inspired by Vionnet: (historical and modern draping)

Vionnet made these gowns 
for the 
Duchess of Windsor
For Madame Vionnet, 
It was all about fabric and cut.

This past weekend I attended Artistry in Fashion (AIF)* at Cañada College in Redwood City CA (San Francisco Bay Area). This is the school with the excellent fashion department , where I have often mentioned I take sewing and fashion design classes.

I was really looking forward to hearing the keynote speaker, Sandra Ericson **, as my draping class teacher, Judith Jackson, has studied with Ms. Ericson  and dropped a lot of little hints about this designer's experiences studying the work and designs of Madeline Vionnet. Madame Vionnet, as you probably already know, was a famed french designer and queen of the bias cut. I knew I'd enjoy the talk, but had no idea that I'd walk away absolutely inspired to learn to cut and drape some bias of my own. 
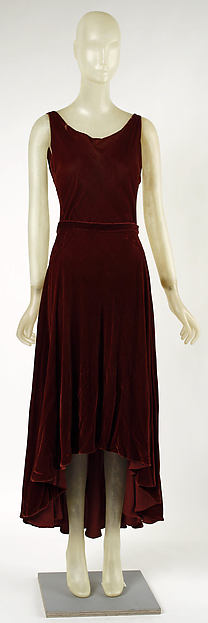
This Vionnet evening dress
makes me yearn
for a piece of silk velvet!

Having only just recently begun to learn about draping, I'm starting to get a sense of the fun involved in smoothing fabric over a dress form, capturing excess, and letting the material speak to me about where it wants to go and what it wants to do. So far in our first four working classes, we're still working with traditional straight of grain and cross grain goods. We haven't moved into bias land yet.

I can hardly wait.


Learning more about designing and sewing garments cut on the bias, is going to be another pathway that keeps this sewist, 
Enchanted by Sewing!
~ ~ ~
Talk and Draping Demo Notes 
* Very few pattern pieces used, often only one or two
* Bias expands and contracts to fit the body
* Though sewing is limited, these styles are not for beginners. Garment constructors should be "champion edge-finishers"!
*For Vionnet, it was all about fabric and cut.

Madame Vionnet was not so much a sewist as she was a "technician". She focused on cut and cloth, analyzing the construction of the cloth and ways that the fibers restricted movement  (Laurel reflects - it's about drape and sway. This reminds me of the Enchanted by Sewing podcast where I interviewed Susan S. and she described herself as a "Fashion Engineer"). 
* Sandra Ericson sometimes drapes wet. I wonder what kind of dress form she uses when she does this? I sure wouldn't drape wet on my foam core "Uniquely You" dress form! Might be OK on my duct tape dummy though...
* Ms. Ericson several times pointed out gussets she used in garments made from the patterns she designs. A couple of women behind me kept whispering, that they didn't know what a gusset is. I tore up a little piece of notebook paper and wordlessly clued them in. 

I think at one time, many home sewers knew about adding gussets for a little extra ease at key points, but in this age of commercial patterns people tend to be leery, or just unaware, of altering garments in this way.

* When you're draping, cut away what you're not going to wear
* Finished some edges with a serger and invisible thread (hem perhaps?)
* Noting S. Ericson's bolero jacket, reminiscent of Balenciaga, we learn he studied with Vionnet, tending to create garments in stiffer fabrics. Laurel thinks this pattern would make a very nice travel jacket.
* Vionnet's principle was to use nothing fake to support the shape of the garment. For example - no shoulder pads. If a sleeve needed more height, she might dart it, to make it stand up
~ ~ ~
Fabrics Used ....
on some of the sample garments displayed in Sandra Ericson's talk 
 Hold the fabric up, let it drop, and see how it hangs

*Rayon - Note rayon has a "high specific gravity" that drags a garment down (Laurel asks, Is that sometimes a good thing?)
* Rayon Twill (donut skirt)
* Silk Velvet (skirt, Komono Cool Top)
* Silk Noil - Laurel says Thai Silks (longtime business with a good reputation, in nearby Los Altos, has very nice silk noil and they sell on the web.
* Wool Crepe (the V- dress, the Midterm dress)
* Heavy Wool Coating (we noted how differently garments made with this fabric, hung versus more drapey materials)
* Light Weight Wool Cashmere
* Upholstery Fabric (the Measure Coast - no pattern - set of instructions purchased and you make it to measure. Includes those now, very familiar, gussets!
* S. Ericson likes hand woven fabrics. She encourages us to see how they hang down.
* Ms. Ericson often uses Nature's Way Muslin (Rocklin?) for making toiles/muslin's when draping, but uses others as well and is checking out a new one she's found.
~ ~ ~
Resources

Fashion Engineer for Work and Play - Snakes Alive Environmental Consultant by Day, Sewist by Night 
Learning about Vionnet's focus on the technical side of working with fabrics, reminded me of this interview with Susan S.

Dress Forms? What are those? How do I get one? Can I make it myself? How much does it cost and how much time does it take?
When you drape - unless you have the luxury of a live model - you generally use a dress form. In this episode of the Enchanted by Sewing Podcast, I describe my experiences creating two different kinds of dress forms. I also provide links to another show, where Lori,  of the Sew Forth Now Podcast, talks about the history of dress forms, as well as her  pre-made, adjustable dress form.
http://www.enchantedbysewing.blogspot.com/2013/09/ench-by-sew-12-dress-forms.html

Center for Pattern Design - Ms. Ericson's Digital Studio 
 Lots of Resources plus her own Patterns for Sale http://www.centerforpatterndesign.com

Of the models I saw in the the talk - I was most partial to the four-square dress, pyramid dress, and cocoon coat. These are not Big-4, slam-bang, mass-market, discount patterns. Inspired sewists are paying for the work of a pattern-design artist. Most patterns seem to range between $20 and $35, at this time.

One place you can see examples of  Vionnet's work, is by searching  the collection of the Met Museum
http://www.metmuseum.org/toah/works-of-art/C.I.46.4.24ab,25ab

Madeleine Vionnet book by Betty Kirke - Classic study on famed draper and technical artist. Includes 30 patterns. Warning, this book is not cheap, but would you get a ton of patterns in addition to the text, so why would it be? Sandra Ericskson mentioned it many times in her talk


Drape Drape by Hisako Soto
This affordable book looks like it might be a good approach to start playing around with draping
http://www.amazon.com/Drape-Hisako-Sato/dp/1856698416/ref=pd_sim_b_4

~ ~ ~
P.S. Next Years Keynote Speaker at Artistry in Fashion is Patti Palmer. You better believe I'll be attending again!

** Yes, Sandra is Lois Ericson's sister

Monday, September 30, 2013

Draping Haiku (Fit)

Draping class recalls

Sewing for my barbie dolls

Find the fabrics dream

The Ultimate Working Pooch - A Postcard from Buster


A Comfort Specialist for several years, Buster helps me
to be more calm and relaxed,
 when I'm having dental work done.
I wish there were more dogs in this line of work!
I once read (and I wish I could remember where I read it) that the Aztecs trained and bred special hairless healing dogs to lay on ill people and do important medical tasks. I know exactly what those fortunate people felt like...

This is Buster. He is a Comfort Specialist at Dr. Lori Doran's Dental office in Palo Alto CA, a twenty minute bike ride from my home. I called ahead to make sure Buster was on duty before I went in for my appointment, and apparently I'm not the only patient who does this. About half of Dr. Doran's patients like to have Buster's help.

Yes, those are my toes down at the end of the dental chair and Buster was laying as close to my chest as I could get him. He adjusts to whatever people want him to do. Some people like him in the knee zone, others on the lap. I like him REALLY close. It's so soothing when I'm having a crown removal and cavity workup like I did that day. 

Of course it's not a job just any pooch can do, but we certainly need more dogs (and perhaps other mammals) like Buster out there.

Thursday, September 26, 2013

Ench By Sew-12 Creating Dress Forms (Podcast Episode)

Co-Published with the Show Notes for Enchanted By Sewing


Hey! The latest Enchanted by Sewing Podcast has been published!
Two Ways to Listen
i)You can listen to the show right on the web by clicking on the this link
** * * 
~ OR ~
ii)  Click on this link to iTunes  to download this and other Enchanted by Sewing shows to your mobile device (iPhone, Android, etc.) free from iTunes 
Did I miss any links mentioned in the show? If so, please post here and let me know, or else email me ,  EnchantedBySewing AT gmail
~~~
This month show is about my experiences creating and using two different types of dress forms - 
a) A duct tape dress form
b) A Uniquely You dress form
~ ~ ~

Please send your thoughts about this month or next month's topic – Jeans Sewing -in the Post a Comment section,  below :-)
~ ~ ~

Please Note
My Uniquely You Dress Form Instructor was Judith Jackson. I referred to her as "our teacher" in the original recording, as I was waiting to ask her permission to include her name. She said 'yes' :-)

In this month's show

1) What is a dress form?
a. A mannequin who’se shaped like you. A fitting or body double, a way to fit patterns, garments, drape and design as though you’re the tailor and the dress form is you
b. Listen to Lori's Sew Forth Now Podcast for a history of dress forms
Lori not only talked about history, she also talked about the style of dress form and I’m not repeating any of that. Please listen to her wonderful show (she said it would remain there for the near future) esp interesting to me is lori’s archeologic work, uncovering the history of dress forms.
Lori uses an adjustable dress form, I worked with two different types – duct tape and a Uniquely You dress form
c.
2) Why I wanted a dress form
a. Fit
b. Trying out patterns and muslins in 3D
c.  Create and play around with my own designs, and minor commercial pattern alterations and design changes
d.  Because Lori made them sound so appealing!
e. Maybe for photographing in my blog….

3) Body Issues and your Team
a. Body issues are a part of our culture
b. Find helpers/team who help us feel good about ourselves
c. A dress form helps us distance ourselves from body issues – it’s just data
d. A dress form helps us notice our best features – what do I want to flatter more?
e. A dress form helps us make patterns or garments we design ourselves more flattering, so we learn to play up our best features
f. A dress form allows us to experiment with a muslin/toile – Can I make a shirtwaist that flatters my figure type?
g. Choosing our Team

4) Two types of dress forms I experienced. Basically what they are,  

5) Cost

6) Materials (tools)   and Resources (web stuff) - I list some Resources below

7) Safety- Working around kids,  young or older goofy, fun loving kids - Two good reasons not to !
8) Social Comfort/Body Issues – You need a work group, at least one other person. Find someone who supports your best interests and helps you feel good about yourself
9) How I’ve used my dress forms , what other things I or others might do w/ them
 - Fitting, altering, trying out new patterns, hand sewing/deconstructed neckbands - helps me conform neckline to lay well on me
- A Wedding in your future? Formal/Special Occasion Wear I would guess that if you’re doing a formal dress for someone with beading or close fitting - and maybe they aren't available at the drop of a hat, might be worth making a duct tape (or other type )  dress form for them


10) Technicos: In-depth details about how I made these two different styles of dress forms. What I actually did to create them

~ ~ ~
Resources

Listen to the Podcast on web - no need to download to a mobile device
http://traffic.libsyn.com/enchantedbysewing/draft5_dress_formENCHANTEDbySewingFINAL.mp3

There are so many fun things about dress forms - making them, draping on them,  displaying historic, artistic and other garments on them, and enjoying them as an art form - whether full sized, half size, miniature or doll size. There are even topiary forms inspired by dress forms. Whenever I see a good dress form that fits any of these categories, I pin it on one of my virtual bulletin boards http://www.pinterest.com/lrshimer/dress-forms/

Lori recorded a Sew Forth Now podcast episode on dress forms. I tried not to duplicate anything she already talked about in this great show

Dress forms are a popular theme with sewing bloggers 

"Threads" Magazine has many articles related to dress forms

Quick and Easy Duct-Tape Dress Form


Some people think Paper Tape works better than duct tape. Haven't tried it myself, but I'd be game!
      http://www.threadsmagazine.com/item/3633/paper-tape-dress-form Paper Tape Dress Form


Kenneth King make an extra body to use for two people  in Threads issue 161
 June/July 2012


I looked in the Threads Magazine Archive to find different articles. You can find that at...
http://www.tauntonstore.com/threads-magazine-issues.html  You can buy individual Threads back issues, if you or your public library doesn't have them on the shelf.


1) "Fit for Everyone" by Kenneth D. King in issue #161. This describes how to sew removable covers to make your dress form work for multiple figures.
A. "Tip: Meet Madeline" by Sandy Moeckel in issue #153. This tip describes how Sandy inexpensively made her dress form suitable for herself as well as her daughter.
1) "Tip: Identical Body Double" by Anne K. Brenz in issue #144. This tip describes the way Anne made her dress form fit her every curve.
"The Dress Form–A Sewer's Best Friend" by Carol Fresia in issue #123. Described below.
"Make An Arm for Your Dress Form" by Shirley Botsford in issue #90.
"Clone Yourself a Fitting Assistant" by David Page Coffin in issue #75. This article explains how to make a dress form from scratch.

~ ~ ~
Things I might try out for arty fun and practice with my dress form 


Making a newspaper dress on a dress form. Fun way to learn draping?


tutu might also be a fun way to experiment with draping on a dress form too "How to make a tutu out of paper" http://www.youtube.com/watch?v=qp6nKpzd0eI

Sunday, September 22, 2013

Jeans Sewing: Demystifying Jeans Drafting (Fit)

A classmate gave me permission to share
this photo of her first muslin being fitted
Notice that a piece of elastic has been pinned along
the waistline she stitched on her muslin. Part
of our fit job, was to make sure that line ended up
at her natural waistline. Do you see the pins at the
side seams? We added fabric beneath those zones.
We can tell the pants are fitting better in this zone now,
because the red lines of stitching that our classmate
basted at the high and low hip, are now
parallel to the floor.
In a recent posting I wrote about the class I'm taking in pants drafting. There, I'll be creating a pattern for jeans that will flatter my figure. (There are commercial jeans patterns that include extra instructions for fitting jeans patterns. )

The drafting process is pretty much new to me. I'd drafted two simple garments from books, but nothing anything along the lines of a pair of pants. Here's what I've learned so far.

First we created a pants block, taking personal measurements and making calculations as directed in the class textbook (*). Both the front and back block are contained within the same drawing, there are just different lines to follow. I found that somewhat heavy banner paper from an office supply store worked best for this. This block pattern does not include seam allowances.

Second I traced the pants block and created two tissue pattern pieces. Now I had separate front and back pieces. Before I cut out the pattern pieces I added 1 inch seam allowances. I measured out from my stitching/fit lines on the block with a clear ruler to add the straight seam allowances, and drew dotted lines where there were curves. I tried a Clover duel-wheel tool to do this - it looks like one of those carbon paper type wheels you might typically transfer pattern markings with - but I couldn't manage to get it to make two dark enough lines.

Third I pinned and cut out muslin pieces. I used a regular single tracing wheel and brightly colored tracing paper to mark every single measurement we'd used to create or draw on the block. These included: straight of grain, waist, high hip, low hip, crotch, thigh and calf. I also marked darts, the side seam, and bottom stitching lines. I used a 200 thread count muslin, which seems to be somewhat tighter than a typical muslin, it cost more too. I read somewhere that you cannot assume that higher thread count means it's better. You have to develop a feel for the good stuff.

I basted every single one of the stitching lines I'd marked with a stitch length of 5. I did use a locking stitch at the beginning and end of my stitching. I staystitched the waist line and bottom of the pants with a stitch length of 2.5. The staystitching keeps the muslin from stretching too much during fitting.

Fourth I sewed the muslin test garment, one leg at a time, then the crotch seam (putting one leg inside the other) for a smooth crotch seam. I left the center front seam open to the bottom of where the fly front zipper would be sewn - so I could put the test garment on !

Fifth I took my muslin test garment to class and worked with my fitting group to begin fitting the garment. This is the point where you look for all the things you often see in books about fit, things like folds in the wrong places, smiles and wrinkles. 

The most important thing I learned at this stage, was to keep the lines basted on the garment either parallel or perpendicular to the floor. Often the signal for a fit problem was that a fit line veered away from the straight.

• Where garments were too tight, we snipped along different basted lines and inserted pieces of fabric. You can see some of that in the illustration above.  
 Where garments were too loose we made tucks and folds.
• We adjusted the rise of some parts of our garment. Typical of this type of adjustment was snipping along the high hip mark, moving the waistline up, and pinning a piece of muslin underneath. Often these adjustments were curved.

Sixth Next, I'll be altering my tissue pieces to create a second pattern draft using the alterations on my muslin test garment, then it will be time to create a second muslin test garment.

Yes, it's a time consuming task. And it's exciting to learn more about how to create garments that truly fit.


Learning about pants drafting definitely helps keep me
Enchanted by Sewing!
~ ~ ~ 
We're using the book Building Patterns, The Architecture of Women's Clothing by Suzy Furrer.

Tuesday, September 17, 2013

Dress Form Haiku

She's my fitting friend
My dress form - separate - but me 

:-)
Foam core, woman spirit
L.R. Shimer

Yes, I am working on the Enchanted by Sewing Podcast for the month of September tonight. 
How did you guess?

Saturday, September 14, 2013

La Biblioteca de Redwood City/Redwood City Library

Constructed in 1921, the main branch of
Redwood City Library was once a firehouse
I remember when the Redwood City Main Library was the fire station. You still get that old slide-down-the-pole feeling when you wander in through the great big brass and glass doors.

I meet up with my IOS study buddy on the second floor once a week in one of the second floor study rooms. I often feel that the spacious, relaxed surroundings contribute to our study success. The second floor is dedicated to independent and small group study. Project Read has a lot of dedicated space on that floor. New readers of all ages are a special focus of programs at this beautiful library. I've noticed a lot of the middle school students developing their reading skills with graphic novels.

The library is a part of the county-wide Peninsula Libraries. I often log onto the county library web site, and search for books from all over the Peninsula, that I can then ask to be sent to a library within walking distance of my own home, for just 75 cents. I can also return materials from any library in the system to a local library.Wouldn't the development of the internet have been worth it, just to be able to do that?


Followers