Art Journal

Nature Ramblings ~ Past Times Time Travel ~ Romancing Daily Life
Showing posts with label romancing the dress. Show all posts

Monday, August 3, 2015

Romancing my Summery Irish Laurel Dress- Pattern Blue Sky (Part 1)

It's fun looking back at what led to the creation of Fiona, my newly finished Irish Laurel dress. I'm going to talk about this new frock over the course of several blog postings, as I recall what led to the pattern draft, pattern choice, and spirit of the dress. I also plan to dedicate a podcast to Fiona. I'm not sure if I'll produce that 'cast as my August or September show. You can signup at http://enchantedBySewing.blogspot.com to get email notification when new podcasts are released.

I began work on Fiona using a quarter scale sloper pattern, which I traced from a sewing book. There are a lot of slopers on the web that I could have printed out as well.

 My sloper has a bust dart and fisheye front dart like this one.

I wanted Fiona to be empire waisted, but I didn't want to simply gather a high-waited skirt under the bust. 

Design Goals
1) Sleeveless
2) Empire waist
3) One-piece front (and back).
4) Very fitted bodice
5) Pattern with very simple lines
6)  A light, floating and easy feeling summery dress

It really helped working in quarter scale. 

a) Initially I cut apart the bodice below the bust, creating a second, separate torso piece. Then I cut another line at the waist.

b) Notice that I pinned in the bust dart (goal 4) and put some padding under it to give me the sense of a three-dimensional garment. That also shows where a skirt would attach to the stitching line, so I know how long to make the seam line for any pattern piece that might be separate would need to be. 

In this case, as you can see from the curved line I extended the pattern at this below-the-bust point, so that was not an issue. If I were cutting a separate skirt piece, it would be.

c) I then cut apart the skirt as though I were creating a flared skirt pattern. I blogged about making a flared skirt from a sloper shortly after I finished my "French Pattern Drafting" class with Lynda Maynard. This is the first chance I've had to actually make a flared skirt. Of course this flared skirt will not hang from the waist, but I figured it was the same idea.

d) After I taped up the flared skirt - by closing the waist dart and pulling the skirt apart to accommodate that - I graded down from just below the bust (where I cut the pattern apart) to the side seam of the skirt in the area of the full hip. That's the slightly curved line you see drawn in.

Later on, when I created the actual full-sized pattern based on my sloper. I didn't cut apart the bodice, though I did cut away the skirt at the natural waistline, reforming the full front by judicious taping and pattern paper insertion. I did cut several lines to accommodate dart movement however.

Another thought, if this were a really complex pattern, would be to use some kind of small dress form just to do the pattern work without the fit. I'm not sure if this quarter-size would fit a large doll, but it might. Or you could rework this mini-sloper to fit a large doll. Madeline Vionnet used to drape patterns on a fashion doll. 

If the doll represented a child, I'd need to pad it out to represent a more womanly figure. It would be fun to try - if life were only all about sewing!

Saturday, November 8, 2014

Mrs. Obama's Arms Inspire Shirt Dress Sewing and More (Romancing the Dress, Ivy)


Mrs. Obama is an inspiration to me professionally and politically.
Also she inspires me to want to improve my muscles - using sewing as my exercise willpower gimmick!

I've been working on adding weight lifting into my health routine. I'm a regular exerciser, but weights have been a challenge for me to add. They just doesn't interest me like walking, hiking, biking or swimming do. I know, however, that weight lifting is linked to a decrease in health problems that affect ladies of a certain age (osteoporosis). I think it may help with my posture improvement program. I know that it improves lean muscle mass, which increases my metabolism rate (never a bad idea). It's clear from her toned physique and excellent posture, that Mrs. Obama has mastered this exercise skill. Isn't it nice when our leaders and their spouses are not only professional and citizen role models, but health models as well? Images of our president's beautiful wife  have reinforced my desire to improve my own biceps, triceps, and .... you know all that other arm area stuff.


Oh yes, this is my sewing journal!

I don't know 'bout you, but I sometimes have to fool myself into liking a new exercise. I think I may have found the secret for making weight lifting more fun for me. 

You probably guessed that has something to do with sewing...

Here's how I do it... 

Over the last week, I've been working on a new dress, I call Ivy. I had the piece of forest green, raw silk (silk noil) you see below, in my fabric inventory, just waiting for more meaning in it's life, then could be found in my armoire. I bought the material at Thai Silks/Exotic Silks in Los Altos a year ago, planing to create a shirt dress for last fall's Draping class. Part way through the semester, I realized, that I wasn't quite ready to drape something with that much detail, so I made a simpler linen dress with a front zip instead. Since then I've altered a commercial shirt dress pattern to create just the  type of dress I wanted. (More about my pattern work and sewing experiences in my recent Shirt Dressing audio podcast. You can also read blog postings I wrote about my first shirt dress "Peaches and Cream".)
A little pinning, a little cutting - it all fits great in between
ten curls, rows or other weight bearing exercise moves.
Don't you love this deep forest green silk noil/raw silk?
I bet Mrs. Obama would approve!
I'd like to wear Ivy to several events over the holiday and winter season. I've also got a personal deadline for finishing her. There's a supper party coming up midway through this month. Though these events inspire me to complete Ivy, life gets in the way a bit. Believe it or not, I have a few things to do other than sew :-) ! Of course in addition to fitting sewing in and around those things, I need to schedule in my exercise as well.   New activities like weight lifting might just get overlooked. 


So I setup a multi-tasking project session, alternating between weight lifting and sewing.

My weight lifting program is three sets of six exercises. That's 18 different spots of work. So first I do my first ten bicep/tricep thingies. (Yeah, I forget what each exercise is called, but I know what to do each time, and that's what counts.)  Then, while I'm taking my quick break between exercises, I unfold Ivy and do a little bit - maybe I plug in the iron and set up the board - maybe I pin a seam. Next, as you guessed, I do another batch of ten exercises for the next part of my program (that extended flying arm thing maybe - do you like the professional way I describe my exercises?)  after which I sew that freshly pinned seam or perhaps press what I sewed last time.

Well, you get the idea. I do a little bit of each, sandwiching my sewing and weight lifting tasks together. It also really helps me to get through some of the aspects of creating Ivy that I don't like as much. My least favorite parts of creating a shirt dress are the work on the front facing and collar, with all the interfacing, pinning, pressing and basting, working to get a clean, precise, finished edge. 
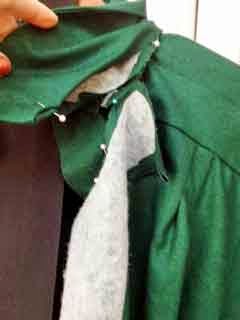
Collar and Front Facing
I'm not as partial to doing the work involved in getting the
interfaced pieces working, as I am to other
aspects of sewing a garment.
Fitting the steps involved in these less desirable activities around weight lifting, gets me through more easily. It also encourages me to stop regularly and stand back from the task, which helps me to accomplish the task more neatly and thoughtfully. It actually makes me less likely to buzz through too quickly (in an attempt to
Anything that helps me avoid those
 painful personal sessions with
Auntie Seama Rippah is to be encouraged!
finish what I don't like to do), which can typically result in a painful session with Auntie Seama Rippah. I know that never happens to you, of course.


When we elect Mrs. Obama as president a few years down the road, I'm going to write her a fan letter. Of course I'll tell her I respect her stand on important issues. And then I'll let her know that she's been an inspiration to me for quite some time...
~ ~ ~
Web Resources

Let's Not Invite Auntie Seama Rippah for the Holidays! http://meencantacoser.blogspot.com/2012/11/avoiding-auntie-seama-rippah-for.html

I recommend Exotic Silks (formerly Thai Silks) highly for both price and quality. They are a local business, but you can buy their products on-line. http://www.exoticsilks.com

My Enchanted by Sewing Shirt Dressing Audio Podcast (listen on-web or download to your mobile device) http://www.enchantedbysewing.blogspot.com/2014/09/ench-by-sew-024-shirtdressing-and-fall.html

A wrap-up posting about my first shirt dress project, "Peaches and Cream" http://www.meencantacoser.blogspot.com/2014/09/terminado-completing-peaches-and.html

Mrs. Obama's Exercise Program http://www.telegraph.co.uk/news/worldnews/michelle-obama/6156655/Michelle-Obamas-arms-the-nine-minute-secret.html

More Sewing Inspiraton from Mrs. Obama - A blog kept for five and a half years that records many aspects of the first lady's wardrobe http://mrs-o.com

Saturday, December 1, 2012

Technicos: Don't be Mad - Be Plaid

Though Vogue 8810 is a relatively straightforward pattern I've made before (in a straight skirted version), The CA Romance Dress is challenging for several reasons:

1) Susan's helping me to alter the pattern for an improved fit. I wrote about that in "Further Adventures of the CA Romance Dress".  I liked this dress shape before, but I'm liking the new tissue shape I saw in the mirror even more. Could I have been happy making this dress without these changes, working on my own pinning in front of the bathroom mirror? You bet I could. But I'm taking classes and it's a great chance to learn more about fitting techniques. I'm going to feel majorly couture wearing this creation!

2) I'm making this version with a wide bias cut skirt.  I'm using plaid fabric. Oh boy - plaid.

3) I'm working with only 4 yards of fabric, the bare minimum for the full-skirted version. (I won't be able to squeak the full-length sleeve out, you betcha).And BTW did I mention I'm using plaid fabric?

What helped? Pattern weights combined with pins. The pattern and fabric on these great big skirt pieces tends to shift about. Just as soon as I'd have it pinned on one side, it shifted on the other. So I switched to  laying out a whole lot of pattern weights first, moving them around and around, shifting and moving the fabric as I went until all the lines all around the piece seemed to be lining up.

After all the pattern weights were in place, then I pinned. And I used lots and lots of pins.

Previously I thought pattern weights were just for people who used them instead of pins. Now I think they made it possible for me to do some challenging plaid matching. Thanks to Kathleen and her husband who made these pattern weights for our sewing lab at school!

A Couple of Other Things I learned:

* After I already started cutting another Sewing Lab inhabitant suggested next time I make bigger seam allowances (maybe an inch instead of 5/8 inch), so that I can tweak the plaid matchup a little if the fabric pulls slightly out of do-wacky when I'm cutting. Would have been a good idea, but too late.

* Richard suggested that I stay/reinforcement stitch my bias-cut seams (in this case, the skirt side seams) when I was fretting about the challenges of that newly stretchy cross-cut side moving around on my when matching up those seams where the plaids come together in a diagonal manner. He also told me not to stress it too much when it comes to plaids, and just to enjoy it!

He's right. It's not a contest. The point is to have fun.
My fabric isn't, of course, wide enough to cut both sides of
the full bias-cut skirt front or back
So I cut each skirt piece - front and back- out twice
A total of four skirt pieces to cut
That 'flip!" note reminds me that I want to
cut mirror images of each piece.
I'm sure you'd never make a mistake doing that, but I sure have!
When I pin the pattern to the plaids, I pin on the seam line
Not the cutting line
The fabric can shift between the cutting and seam line
I test to make sure that I've still got plaids matching over and over
as I lay out each piece
It's not enough just to get the  seam's matching
We try to get all the plaids matching around the entire piece
THEN we work to matchup the plaids on this piece with plaids on the
pieces this will be sewn to. That would be
skirt front to skirt back, skirt top to dress  bodice, in this case

Notice I used pattern weights not only around the edges, but in the middle too. It helped really get the pattern to lay flat. (The pattern is in the middle here, I've already cut one piece and now it's flipped over. I put pins through the grainline to make sure it's laying straight, though the plaid matching makes that pretty durn  likely as well.

Friday, November 30, 2012

Further Adventures of the CA Romance Dress

Ingredients for my CA Romance Dress

Being the further adventures of the California Romance Dress

I talked about my plans for my CA Romance Dress in my October Podcast, Romancing the Dress (Ench-002). It was in my sewing basket for November, but I put it off because:

1) I wanted to spend my sewing time reinforcing pants/trouser sewing skills I was working to improve in two different sewing classes at Cañada College*. There's not point in sewing all those different pants pieces samples and not getting abundant practice in making use of the bits and pieces learned in the real deal. Pants sewing isn't really exciting, but is sure is useful. Plus, as I've mentioned, I'm working towards learning to sew jeans so I want my basics pants sewing skills to be really solid.
2) My friend Susan had suggested that the pattern I planned to use could use some alterations in the bodice. Gee, it didn't really soooouuuund like those alterations would be a ton of work.....

Oh Har de Har Har (there's an expression you don't hear much these days)

I had the opportunity to work with Susan in sewing lab on those alterations today. I had the pattern muslin/toile mocked up in a combination of tissue and old sheets (why waste new fabric?). 

It took four hours to make the adjustments and I'm still not sure about how to cutout the sleeve, given the alterations Susan made. I'll probably be basting the ones I toiled onto my dress before I cut them. I'm really short on fabric and I can't afford to mess them up.

After Susan finished her changes to the pattern I spent the next two and a half hours cutting out the skirt and the bodice. I still have the front band and sleeve to layout and cut.


Why so long on the cutting you ask?

Plaids! 

My next Blog Entry will be "Technicos: Don't be Mad - Be Plaid"

Daydreams and pattern details for this dress are in "Romancing the Dress: Envisioning the CA Romanced Dress"


Have you downloaded any of the free episodes for the Enchanted By Sewing Podcast, from the iTunes Store?


I take sewing classes in the Cañada College Fashion Department, Redwood City, California

Monday, October 22, 2012

Romancing the Dress: Envisioning California Romance

Getting together the goods
For my California Romance Dress
I feel so successful about the black and off-white houndstooth dress I sewed last summer, from Vogue v8810, that I've begun planning my next version of this frock.

What really made this project a success?

1) I liked the look of the completed dress
PLUS
2) I've actually gotten in quite a lot of wearings.

The newest girl in my wardrobe will be made from this pattern and from this pretty plaid shirting and CA poppies trim (did you clue in on the significance of that California Romance name yet?). Since the fabric is  lighter than what's recommended for the pattern, I plan to interline the bodice to create a heavier fabric. Because I'll be making the fuller skirted version, I'm expecting the skirt zone to hold it's own. I may wear it with a half slip though.

I also plan to add a 3/4 sleeve - based on the full length, a more typical length for me, which makes me feel like I can really move around. I'll also include the inseam pockets - with a waistband leash - that I added to the pattern the last time I made it. I can't stand not having pockets. And, as I did last time, no bow-front casing. I'll wear it belted with a nice wide brown leather belt I already own. I'm going to spend a little time altering the bodice, probably taking it back a little bit at the shoulder seam in the front. I'm hoping to try that out with my buddy Susan in sewing lab this week.

This time I'm trying out the
full-skirted version of v8810
with an elbow, or just past sleeve,
Let's just hope I've got enough
material to match those plaids!
This dress represents my idea of real California Romance, a garment that's both practical and pretty for a life that's lived in the every day, not just in an imaginary no-fuss-minimal-movement environment that often seems to be represented by magazine models in high heels and no bike or public transit in sight. As a matter of fact I thought quite a lot about why dresses are important and what makes them work for me so that they can go beyond special-occasion and into my daily wardrobe, so much in fact that I devoted quite a bit of my October "Enchanted by Sewing" podcast  to the theme of Romancing the Dress. This second show in
this relatively new free podcast show series will be up in the iTunes store before the end of this month. You can search iTunes using the phrase "Enchanted by Sewing", or simply signup to receive email notifications of all new shows (no spam!) at the Show Notes site for Enchanted By Sewing.


Followers